Showing posts with label signature christmas. Show all posts

My Official 2010 Christmas Card...

Monday, December 13, 2010

Hello, hello!  I mailed out our Christmas cards on Friday, so I thought it would be safe to share them with you here today.  I tried to pick a very simple design, but nothing is ever simple enough when you are making 75 cards!  My cards used 5 different stamps (wreath, sentiment, text background, trio of berries, single berry).  What was I thinking?  I spent two Girls Craft Nights, a Sunday in front of the tv watching the Bengals lose, and an evening home alone to make these cards.   


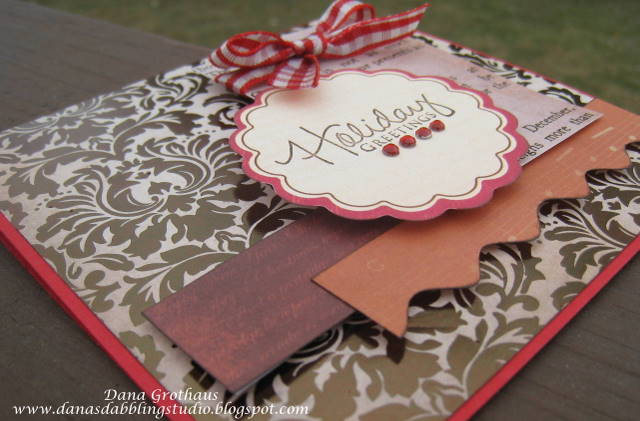
So, here it is. Our official 2010 Christmas card:
Sorry it's a little bit dark, I took about 40 photos and I couldn't get it any better than this.  Here's another view of the sentiment and text background:
And here's the inside:
And here's my name stamped on the back:
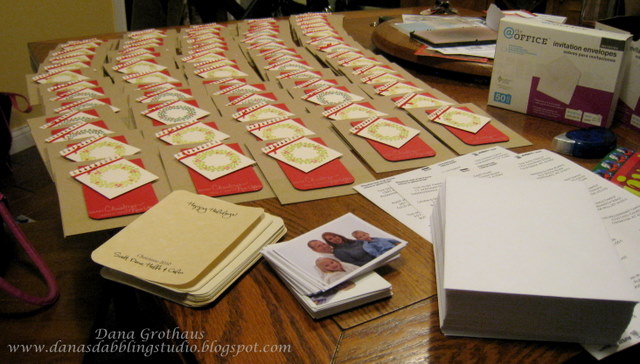
And here's what my kitchen table looked like as I was getting ready to adhere the inside panel, stuff them in envelopes and apply the mailing labels.  
I mailed 60 of these.  My extended family is rather large!  The remaining 15 will be delivered in person to neighbors and teachers accompanying some homemade goodies.


Whew, I feel so much better now that these are finished!  If you are interested, here are my 2009 and 2008 Christmas cards.


The kids had their first snow day today.  We're getting ready to head out and play in the snow.  Have a great day!
{Merry Christmas & A Happy New Year}
Stamps: Signature Christmas, Wreath for all Seasons, Text Style (Papertrey Ink) 
Card Stock: Kraft, Pure Poppy, Vintage Cream (Papertrey Ink)
Ink: Moss Green, Warm Red (Colorbox), Vintage Cream (Papertrey Ink)
Accessories: Corner Rounder Punch, Spiral Notebook Die (Papertrey Ink), Foam Dimensionals, Red Floss (DMC)
Bookmark and Share 

Read more...

OCC Challenge - Tag, You're It!

Saturday, November 27, 2010


 Hello!  I'm here bright and early with a new challenge from Our Creative Corner.  This one is particularly fun and got me right in the holiday spirit.  The challenge is to make a tag.  Fun, right?  It does not need to be a holiday theme, it could be for anything.  


For my tag, I chose to use a cream and red color scheme.  The patterned paper is from Be-Loved by My Mind's Eye.  I've been using that a lot lately.  I also used a spiral notebook die from Papertrey Ink as well as an oval and a labels 9 nestabilities die. I attached the tag to the handle on the bag by threading the rope through one of the center holes in the paper, then I also taped the tag to the bag to make sure it wasn't going anywhere.  
I hope you have time to play in this fun challenge.  Head on over to Our Creative Corner and check out all the variations of tags we came up with.  Have a great weekend!!!
{Joy to the World Tag}
Stamps: Signature Christmas (Papertrey Ink)
Card Stock: Vintage Cream, Pure Poppy (Papertrey Ink)
Patterned Paper: Be-Loved (My Mind's Eye)
Ink: Vintage Cream (Papertrey Ink), Real Red (SU)
Accessories: Oval & Labels 9 Nesties (Spellbinders), Snowflake Punch (Martha Stewart), Stampin' Sponge, Button, Red Floss (DMC), Spiral Notebook Die (Papertrey Ink), Red Rhinestones (Kaiser Craft)
Bookmark and Share 

Read more...

A "Holiday Greetings" Card...

Monday, October 25, 2010


Hey guys!  I always forget about the Papertrey Ink Blog Hop until it's too late.  This time Nichole reminded us the day before and she's letting you link your blog all day.  This was such a big help because, I forgot.  So this morning, I made a card, tore it up and made the card you see above.  By the way, the challenge this month was to make a card celebrating winter holidays other than Christmas.  I really like the sentiment "Holiday Greetings" since It covers any holiday.

This card also uses the Mojo Monday sketch, which I love because it's pretty simple.  All of the papers on my card come from the Kaiser Craft paper pad, 'Tis the Season.  The sentiment circle is a die cut from the pad.
Thanks so much for stopping by today!  I hope your week is off to a great start!!!
{Holiday Greetings}
Stamps: Signature Christmas (Papertrey Ink)
Card Stock: Pure Poppy (Papertrey Ink)
Patterned Paper: 'Tis the Season (Kaiser Craft)
Ink: Chestnut Roan (Colorbox)
Accessories: Gingham Ribbon, Foam Dimensionals, Red Rhinestones (Kaiser Craft)
Bookmark and Share 

Read more...

A "Joy to the World" Card...

Monday, October 18, 2010


Since I was working on my Christmas cards over the weekend, I guess I'm still in holiday mode.  This week's CPS sketch as well as the Everything But the Kitchen Sink challenge were pretty similar.  I think this card would fit both sketches.  Paper Maniac is sponsoring the EBTKS one and giving away a $20 gift certificate.

I used papers from the 6x6 paper pad 'Tis the Season from Kaiser Craft.  There was a sheet of these different colored damask stripes that work perfectly for the sketches.  The newsprint patterned paper has writing about Christmas and Santa on it.
The sentiment is embossed in gold.  I love how it shows up so well on patterned paper.

I hope you all had a great weekend!  I'll share some pics of ours soon.  Have a great day!
{Joy to the World}
Stamps: Signature Christmas (Papertrey Ink)
Card Stock: Kraft (Papertrey Ink)
Patterned Paper: 'Tis the Season (Kaiser Craft), Chestnut Roan (Color Box)
Accessories: Gold Embossing Powder (SU), Gold Mini Brads, Gold Ribbon (Offray), Button, Foam Dimensionals, Glue Dots
Bookmark and Share 

Read more...

Aaaack! Let's try this again... A "Happy Holidays" Card...

Sunday, October 17, 2010

Okay, for some reason my post on Friday didn't have the photos loaded correctly and none of you could see the card.  So, I reloaded it and created an entirely new post.  Sorry for the confusion, Enjoy!
Well hello there!  So glad you stopped by today.  I'm so glad it's Friday.  I've been looking forward to this day for about a month now.  Tonight is my craft night with a bunch of girlfriends and most of us will be working on holiday cards.   So, to get into the holiday mood (since it's still around 70* here), I thought I would make a holiday card.  I decided to challenge myself by creating a one layer card.  I thought this was going to be easy, boy was I wrong.  This card took about as much time as any other card I've made.  Plus, there's no where to hide your mistakes.

I started with a Vintage Cream card base.  I took a piece of printer paper and die cut an oval using my largest oval nestabilities die.  I placed the oval where I wanted it on my card and then stamped the text in red covering the entire front of the card (remove the printer paper and you will see a nice oval shape).  Since I used text, the border of the oval wasn't really defined, so I kept the oval printer paper in place and lightly sponged brown around it.  This is how you should do it.  This is not how I did it.  I finished the card and it didn't look right, so I had to sponge the oval with the rhinestones already on hoping it would work and not ruin my entire card.
The rest is easy peasy.  Stamp the wreath, stamp the berries, stamp the sentiment, and then apply rhinestones.    This card really would have been quick if I had chosen a larger background stamp instead of one that needed to be stamped repeatedly and realigned every time.  Oh well, live and learn.  At least it turned out okay in the end.

Have a great day!
{Happy Holidays}
Stamps: Wreath for All Seasons, Text Style, Signature Christmas (Papertrey Ink)
Card Stock: Vintage Cream (Papertrey Ink)
Ink: Chestnut Roan, Lipstick Red (Color Box), Real Red (SU)
Accessories: Red Rhinestones, Oval Nestabilities (Spellbinders), Stampin' Sponge (SU)
 Bookmark and Share 

Read more...

A One Layer "Happy Holidays" Card...

Friday, October 15, 2010

Well hello there!  So glad you stopped by today.  I'm so glad it's Friday.  I've been looking forward to this day for about a month now.  Tonight is my craft night with a bunch of girlfriends and most of us will be working on holiday cards.   So, to get into the holiday mood (since it's still around 70* here), I thought I would make a holiday card.  I decided to challenge myself by creating a one layer card.  I thought this was going to be easy, boy was I wrong.  This card took about as much time as any other card I've made.  Plus, there's no where to hide your mistakes.

I started with a Vintage Cream card base.  I took a piece of printer paper and die cut an oval using my largest oval nestabilities die.  I placed the oval where I wanted it on my card and then stamped the text in red covering the entire front of the card (remove the printer paper and you will see a nice oval shape).  Since I used text, the border of the oval wasn't really defined, so I kept the oval printer paper in place and lightly sponged brown around it.  This is how you should do it.  This is not how I did it.  I finished the card and it didn't look right, so I had to sponge the oval with the rhinestones already on hoping it would work and not ruin my entire card.
The rest is easy peasy.  Stamp the wreath, stamp the berries, stamp the sentiment, and then apply rhinestones.    This card really would have been quick if I had chosen a larger background stamp instead of one that needed to be stamped repeatedly and realigned every time.  Oh well, live and learn.  At least it turned out okay in the end.

Have a great day!
{Happy Holidays}
Stamps: Wreath for All Seasons, Text Style, Signature Christmas (Papertrey Ink)
Card Stock: Vintage Cream (Papertrey Ink)
Ink: Chestnut Roan, Lipstick Red (Color Box), Real Red (SU)
Accessories: Red Rhinestones, Oval Nestabilities (Spellbinders), Stampin' Sponge (SU)
Bookmark and Share 

Read more...

A "We Wish You a Merry Christmas" Card...

Wednesday, October 6, 2010

Hey guys!  You all know how much I love taking photos of my cards outside.  I love the natural light and I usually don't have to edit them, besides cropping.  I especially love when our tire swing is in the background.  Go back and look, there are a ton of photos with our tire swing in them.  Anyway, I finally got tired of my cards blowing away/over and me freezing my tail off.   So, until Spring comes, I'll be taking photos inside.  I did this last year as well but have learned a lot since then.  These are the first photos I've taken with my new set-up.  They are still not where I would like them (see how the left side is darker-Ugh!), but they are good enough to share.

Okay, onto my card.  I recently ordered most of my supplies for this year's Christmas cards.  In addition to a new stamp set and card stock, I ordered the Spiral Notebook Page Die.  To make my notebook page look more realistic, I used some Basics Manila paper from Basic Grey that had a notebook design on it.

I will admit that these colors are not traditional Christmas colors.  The patterned paper comes from the Kaiser Craft paper pad 'Tis the Season. The newspaper has some holiday writing and pictures on it and the rust colored rectangle is the sheet music for "We Wish You a Merry Christmas" which is why I picked that particular sentiment to go on the notebook page.
This card sorta has an Old World, rustic feel to it.  I think I like it.

 Thanks so much for dropping by today!
{We Wish You a Merry Christmas}
Stamps: Signature Christmas (Papertrey Ink)
Card Stock: Kraft (Papertrey Ink)
Ink: Dark Brown, Chestnut Roan (Colorbox)
Accessories: Spiral Notebook Page Die (Papertrey Ink), Geneva Brads (Bazzill), Sheer Ribbon (Offray), Foam Dimesionals
Bookmark and Share 

Read more...

Our Creative Corner - Christmas in July

Saturday, July 31, 2010


Hello!  I'm here with another fun challenge from Our Creative Corner.  This week we are celebrating Christmas in July.  It's kind of an odd feeling making a Christmas card in the summer.  My photo looks a little silly since it's obviously summer in the background.  

I got to play with some new stamps on this card.  A friend lent me some of her stamp sets and I had a ball just playing around.  I love the modern feel of those circles.  
I didn't have green ribbon to match this card, so I took a piece of white grosgrain ribbon and colored it with a plain old crayola marker. I was surprised  how well it soaked up the color.

Head on over to Our Creative Corner and check out the rest of the design team's festive samples.  We would love you to play along this week!

{Happy Holidays}
Stamps: Shapes by Design, Signature Christmas (Papertrey Ink)
Card Stock: Kraft, Vintage Cream (Papertrey Ink)
Ink: Real Red, Old Olive (SU)
Accessories: Oval Nestabilities Die (Spellbinders), Red Rhinestones (Kaiser Craft), Grosgrain & Sheer Ribbon (Offray), Stampin' Sponge (SU), Foam Dimensionals
Bookmark and Share

Read more...
Related Posts with Thumbnails

  © Free Blogger Templates Columnus by Ourblogtemplates.com 2008

Back to TOP