Showing posts with label designer lines. Show all posts

Another {Valentine's Day} Card...

Wednesday, January 16, 2013

Hi!  Yep, another Valentine's Day card.  I'm running so low on red card stock that I'm starting to get nervous!  I only have scraps left.  I need to reorder, stat!  

I started working on this card Sunday, I had the perimeter of the card done and then it just sat for a couple days, not knowing where to go.  I finally decided on a Valentine's theme.  The scroll and sentiments come from Love Cupid, which has been seeing a lot of action lately.  And the little randomly stamped heart is from Taglines: Critters, but any little heart will do.  
Designer Lines is definitely one of my favorite  background building stamp sets.  Its so versatile and the images are so bold and graphic, my favorite.

Have a great day!

{Happy Valentine's Day, Sweetheart}
Stamps: Love Cupid, Designer Lines, Taglines: Critters (Clear & Simple Stamps)
Card Stock: Cre'me de la Cream, Dare to Be a Diva Red (CSS)
Ink: Perfect Little Black Dress, Dare to Be a Diva Red (CSS)
Accessories: Foam Dots

Read more...

A {Be Mine} Valentine Card...

Wednesday, January 9, 2013

Hello!  It's been hard, but I am determined to post five times a week.  Hopefully once I get going, I won't be able to stop.  So, this morning I was checking out my Google Reader and stumbled upon the Silhouette free shape of the week (one of the many things I love about Silhouette), and the shape was actually a full card with all the embellishments.  I really liked the card base, so I decided to use that for my card today.  Everything you see in pink was cut with my Silhouette, the hearts at the bottom were the centers of the hearts at the top.

I really liked the diagonal lines at the bottom of the card the was made on the Silhouette Blog, so I recreated that using lines from Designer Lines from CSS.  I simply placed post-it notes over the top of the card when I stamped the lines in black.
The sentiment comes from Love Cupid.  The hearts and sentiment panel are all popped up on foam dots.

I love Valentine's Day!  I'm sure you'll be seeing more Valentine's Day stuff from me leading up until the big day.

Have a great day!

{Be Mine Valentine}
Stamps: Love Cupid, Designer Lines (Clear & Simple Stamps)
Card Stock: I'm a Princess Pink, Cre'me de la Cream (CSS)
Ink: Perfect Little Black Dress (CSS)
Accessories: Digitally Cut Image (Silhouette), Gems, Foam Dots

Read more...

CSS Group Project: Joyful Resolution

Wednesday, December 26, 2012


Hello!  I have a super fun project to share with you today.  It's group project day for Clear & Simple Stamps and today we are sharing a New Year's favor along with a crafty resolution for the new year. 
I had so much fun making this wine tag.  As soon as I had the idea of using the champagne class for the #1, I was ready to go!  It's funny how it takes just a little something for my mind to go into overdrive.  
I started with a strip of card stock about 7" long and a little less than 2" wide.  I used a circle die from Shapes: Circles to make the opening that would slide over the wine bottle neck.  I stamped it using the woodgrain stamp from Background Basics 1.   The label itself uses a frame Label Frames 1 stamped using Dare to Be a Diva Red ink and then cut out.  I added some diagonal pink lines using Designer Lines.  That cute little wine glass is from Taglines and is colored using copic markers.  The die cut numbers were adhered using foam dots, so they literally pop off the label.  The sentiment is from the Limited Edition set JOY.  
As far as my crafty resolution is concerned, it's all about organization.  From keeping a blog agenda, scheduling more posts,  handing in projects before the deadline, to keeping my studio space neat and tidy.    

Be sure to check out the designers projects and resolutions:


Have a great day! 

{NYE Wine Tag}
Stamps: Background Basics, Label Frames 1, Designer Lines, LE Joy, Taglines (Clear & Simple Stamps)
Card Stock: Kraft Like a Rockstar, A Blanc Check (CSS)
Ink: Perfect Little Black Dress, Dish All the Dirt Brown, Dare to Be a Diva Red, I'm a Princess Pink (CSS)
Dies: Shapes: Circles, Numbers (CSS) 
Copics: Y32, Y35, W1, 110
Accessories: Foam Dots 

Read more...

{Personalized} Holiday Tags...

Friday, December 14, 2012


Hello!  Happy Friday!!!  Every year my girlfriends and I go out to dinner and exchange a little gift.  We did this a few nights ago, so I can safely share these on my blog.

Last year I crocheted everyone a scarf and I've made treats in previous years.  I really went a different way this year and bought them something.  It's something I would like to receive myself so I knew they would like them.  You can see in the photo below that they each received a 5-pack of drink mixers.  You mix each bottle with a certain type of alcohol (rum, tequila, or vodka).  I found these at Target.

You can see the tags I made above (I just had to make something!).  And below you can see them tied with a big red ribbon around the handle on the drink mixes.
These tags were made using four sets of CSS dies: Uppercase Alpha, Lowercase Alpha, Tags 1, and Leaflets. Once I had everything die cut, I just assembled everything.  
The letters are actually stamped with a houndstooth pattern from Designer Lines.  It's red ink on red card stock.  In person it shows up really well, but it did not show up in the photos. 
Have a wonderful weekend!

{Holiday Tags}
Stamps: Taglines, Designer Lines (Clear & Simple Stamps)
Card Stock: Kraft Like a Rockstar, Glamazon Green, Dare to Be a Diva Red (CSS)
Ink: Dare to Be a Diva Red, Glamazon Green (CSS)
Dies: Leaflets, Tags 1 (CSS) 
Accessories: Mini Hole Punch, Foam Dots, Ribbon

Read more...

An {Oh Baby!} Card...

Thursday, December 6, 2012

Hey friends!  All of my Christmas cards were mailed out this morning and I feel like a weight has been lifted!  It was so nice to sit down and make a non-holiday card.  I decided to make a baby card using Baby Shower and Designer Lines from CSS. 

I started with a kraft card base, then die cut the giraffe into the base.  I cut the brown and blue strips separately, using masking tape to hold the die in the right place while it ran through the Cuttlebug. 

I adhered a square of pink card stock behind the giraffe opening and added a bow to make this card look a little more feminine.  

Thanks for stopping by!

{Oh Baby!}
Stamps: Baby Shower, Designer Lines (Clear & Simple Stamps)
Card Stock: Kraft Like a Rockstar, I'm a Princess Pink, Trendsetter Blue, Brown Leather Satchel (CSS)
Ink: Paint the Town Pink, True Blue Fan, Dish All the Dirt Brown (CSS)
Dies:  Baby Shower (CSS)
Accessories: Red/White/Pink Twine (CSS), Corner Rounder Punch

Read more...

CSS Group Project!

Tuesday, November 20, 2012

Can you believe that Thanksgiving is just a few days away?  Crazy, huh?  Appropriately, today's Clear & Simple Stamps design team group post is all about giving thanks.  Each of us has created a THANK YOU card to share on our blogs today.  

My card uses traditional fall colors and is pretty clean and simple.  I created a sort of collage using different elements, colors and textures.  

Be sure to hop around and see what each designer created!  


I have many, many things to be thankful for.  One of them is that I have a creative outlet in this blog and that I have the nicest people stop in and see what I created and share my enthusiasm for this craft.  From the bottom of my heart, THANK YOU!

Have a great day!

{Thank You}
Stamps: Leaflets, Designer Lines, Label Frames 1, Well Preserved (Clear & Simple Stamps)
Card Stock: Kraft Like a Rockstar, Cre'me de la Cream, Brown Leather Satchel (CSS)
Ink: Dish All the Dirt Brown, Dare to Be a Diva Red, Orange You Fabulous (CSS)
Dies: Leaflets (CSS) 
Accessories: Edge Distresser, Brown/White Twine (CSS), Foam Dots, Corner Rounder Punch

Read more...

CSS's Simple Cuts & WCMD!

Saturday, October 6, 2012


Hello there!  Hope you are having a great Saturday!  In celebration of World Card Making Day, Clear & Simple Stamps has just released some new dies that coordinate with some popular older sets.  Today I'm sharing a card I made using the newly released dies for A Guy Thing.

First, I took the blue panel, a ruler, and pencil and marked where I wanted the ties.  The panel is 4" so I made a mark at 1", 2", and 3".  That's how I was able to line up the tie die up so perfectly.  When you need to use a die in an exact place, I always use masking tape to hold the die right where I need it as it goes through my Cuttlebug.  

Now for the fun part!  I had so much fun with these ties.  I used a "kissing" technique for the designs on the ties.  If you are not familiar with this technique, I'll try to explain.  First, start off with a solid image stamp like the solid tie from A Guy Thing.  Next, pull out some stamps that have fun patterns on them, in this case I chose some designs you might actually find on a tie.  What you do is ink up your solid image stamp (tie), then press it against the patterned stamp (kiss them together!), this will cause the ink to be removed from the solid stamp, leaving the patterned design on the solid stamp.  Then stamp on your project.   

I hope you were able to follow that!
Check out the Clear & Simple Stamps Blog to check out the other dies that are being released and links to projects from the other design team members.  

Be sure to stay tuned next week for the official Collection 5 release kicking off October 10th!!!

Have a great day!

{Happy Birthday}
Stamps: A Guy Thing, Trendy Tags 2, Designer Lines (Clear & Simple Stamps)
Card Stock: Trendsetter Blue, Kraft Like a Rockstar, Your Style Blue Me Away (CSS)
Ink: Your Style Blue Me Away (CSS), White
Dies: A Guy Thing (CSS) 
Accessories: Corner Rounder Punch, Foam Dots

Read more...

CSS Style Watch!

Saturday, September 8, 2012


I have a super fun project to share with you today!  I'm sure you have an iPhone or knows somebody that does. Seems like everyone has one but me, but I'll be getting one shortly when the new one comes out.  What does do crafting and iPhones have in common you ask?  Well, CSS has created a template to design your own insert to go with those clear iPhone cases!!!  I love those trendy and fun cell phone covers, but they are so expensive!  This way, if you already have a clear case, you can change out your insert everyday using supplies you already own.  If you are having a hard time following me, here are some photos that may help.
Here's the template printed on regular copier paper.  I didn't want all of my inserts to use the same color card stock, but I also didn't want to be wasteful by printing the template out a bunch of times of different colored card stock.  You can see here that I planned ahead as to what color and design would be on each template.
I cut four pieces of card stock (from scraps) to fit right over each template and then adhered them with masking tape.  This worked really well and didn't get come apart in my printer. 
Here's what they looked like off once removed from the printer paper.
I would definitely recommend stamping your template and then cutting them, so much easier that way.  If you look closely, you can see the template under all that glorious stamping. 
Once I had the iPhone Cover Inserts made, I needed a cute way to give them to my friend.  Since these covers will reflect how cool, trendy and unique she is, I wanted a card to go with that theme.  
I created a little pocket on the inside of the card so that the inserts could slip right in.  
You can download the template by clicking HERE.  I was just thinking that it would be really cool to use the template on photos as well.  I would probably cut the template on card stock first and use it as a stencil on a photo.  I've seen custom photo covers and I'm sure they are pricey. 

Some of the other design team ladies are getting in on the actions!  You won't want to miss their awesome creations!

Stephany Zerbe

Have a great day!

{You Are an Original}
Stamps: Sunburst, Craft Room (Clear & Simple Stamps)
Card Stock: Dare to Be a Diva Red, A Blanc Check (CSS)
Ink: Dare to Be a Diva Red (CSS), White
Accessories: Foam Dots, Sticky Tape, Circle Punch

{iPhone Cover Inserts}
Stamps: Background Basics 1, Squares Plus, Designer Lines (Clear & Simple Stamps)
Card Stock: Kraft Like a Rockstar, A Blanc Check, Green With Envy (CSS)
Ink: Dare to Be a Diva Red, Dish All the Dirt Brown, Say Yellow to All Your Fans, Orange You Fabulous, Glamazon Green, Your Style Blue Me Away, Simply Blue-tiful, Purplicious (CSS)
Accessories: iPhone Cover Template

Read more...

CSS Release in Review

Tuesday, June 5, 2012


Hello!  Welcome to the Clear & Simple Stamps Release Review party!  I had so much fun making this little gardening ensemble.  My husband built me an 8' x 4' raised garden bed and guess what?  Plants are actually growing!  I thought for sure that I had black thumb since I kill pretty much everything I plant.

So, about my ensemble... I used Designer Lines to create a sort of "lattice" for my plants to grow up.  I attached a brown piece of card stock along the bottom as the flower bed.  It was so much fun building the scene with flowers and sentiments from All Occasions 2.

I carried the lattice element from the card over to the favor box.  The box was made using the Party Favor 3 die.  This time I wanted the flowers to look like they were climbing the lattice.
 The little tag says "open me" so you know I'm going to give you a peek inside.  It's seed packets!
I can't wait to see what the rest of the DT created, and I know you can't either!  Be sure to visit all the ladies:


Have a great day!

{Garden Party}
Stamps: All Occasions 2, Designer Lines (Clear & Simple Stamps)
Card Stock: A Blanc Check, Brown Leather Satchel, Purplicious, VIP Purple (CSS)
Ink: Green With Envy, Glamazon Green, Purplicious, VIP Purple, Dish All the Dirt Brown
Dies: Party Favor 3 (CSS), Mini Tag (CSS)
Accessories: Foam Dots, Purple/White Twine (CSS), Tissue Paper, Seed Packets  

Read more...

CSS Release Review--Day 3

Sunday, June 3, 2012


Hey guys!  I'm here to review the Uppercase Dies that Clear & Simple Stamps released last month.  I am seriously obsessed with both the Uppercase & Lowercase dies.  They are so easy to customize and personalize any project.

I'm not sure where the idea for this card came from, but as soon as the idea popped in my head I just had to create it.  The idea is that the letter "fell" from their original position and now reflect the mirror image of the letters "THANKS".  I adhered them in place before I sewed along the tops of the letters.   
The chevron stripes from Designer Lines were stamped on a piece of white card stock that was adhered directly under the negative space of the letters.

There are a few fellow DT members showing off even more alpha creations.  Be sure to check them all out:


And that's not all, I have a card featured on the Clear & Simple Stamps App today!  It uses another set that I'm obsessed with!  Do you see a trend?
Have a great day!

{Thanks}
Stamps: Designer Lines (Clear & Simple Stamps)
Card Stock: A Blanc Check (CSS)
Ink: Dare to Be a Diva Red (CSS)
Dies: Uppercase Alpha (CSS) 
Accessories: Foam Dots, Sewing Machine & Red Thread 

Read more...

Another {Happy Birthday} Card...

Wednesday, May 16, 2012


Hello!  I've been a busy girl this past week.  The kids only have four days of school left and my friend and I have been trying to do all the things we'd said we'd do together throughout the year (while our kids are in school).  We've been doing stuff maybe once a month and we just did four things in the last two weeks.  All the girl time has made my soul happy, though.  


It feels like FOREVER since I've had some serious studio time.  I made this card for this week's CPS Sketch.  It was so simple (like they always are) and perfect to get my mojo heading in the right direction.


I stamped the sentiment first, masked the sentiment and then stamped the lattice image.  Easy peasy for sure!


Have a great day!

{Happy Birthday}
Stamps: Designer Lines, All Occasions 2 (Clear & Simple Stamps)
Card Stock: Green With Envy (CSS)
Ink: Perfect Little Black Dress, Glamazon Green (CSS)
Accessories: Corner Rounder Punch

Read more...

CSS Group Project!!!

Tuesday, May 8, 2012


Today we get to share our group projects!  I just knew I'd want to use the new alpha dies no matter the theme.  This month's challenge was to make two cards,  a boy version and a girl version.
If you can't tell , the yellow and gray card is masculine (I think yellow is gender neutral, right?).  Plus, the black and gray houndstooth pattern in the background makes it even more masculine.

How I did it: I cut the pink and yellow card stock to 4" x 5", arranged the dies how I wanted them on the card and ran them through my cuttlebug making sure not to lose the little inside piece for the letter "A".  I wanted the letters to be arranged the exact same way on each card, so before I removed them from the card stock, I put a piece of tape over the six letters and picked them all up at one time and then put them on the next piece of card stock.  The tape ran through the cuttlebug along with the dies and I was able to slowly peel it off.
Before attaching the front panel to the card, I stamped a background from Designer Lines in black ink on the card base and stamped the sentiment on the front panel.
When I attached the die cut panel to the card base I used foam dots for added drama.  You'll want to attach the center of the "A" at this time using a foam dot as well.
You won't want to miss what the rest of the deigned team has in store for you!  Check them out here:


Have a great day!

{Thanks, You Are Amazing}
Stamps: Designer Lines, All Occasions 2 (Clear & Simple Stamps)
Card Stock: Say Yellow to All Your Fans, Simply Blue-tiful, Coral Necklace, You're Such a Gray-cious Host (CSS)
Ink: Perfect Little Black Dress (CSS)
Dies: Uppercase Alpha (CSS) 
Accessories: Foam Dots

Read more...

CSS Release Day!!!

Saturday, May 5, 2012


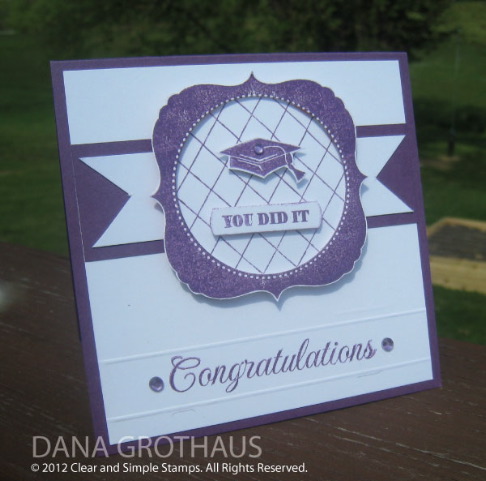
Hello!  It's release day and I can finally share with you what I've been working on!  This graduation card uses three new sets: Occasions 1, Trinket Sentiments, and Designer Lines.  I love them all, but am obsessed with Designer Lines, they are so trendy and you can do so much with them.  You'll be seeing those a lot from me.


I created a panel using lots of Purplicious ink and cutting.  
I made the sentiment stand out by scoring the backside of the card stock above and below the sentiment.
Be sure to check out what the Design Team girls created with their new fantastic stamps!

Have a great day!

{Congratulations}
Stamps: Occasions 1, Trinket Sentiments, Designer Lines (Clear & Simple Stamps)
Card Stock: A Blanc Check, Purplicious (CSS)
Ink: Purplicious (CSS)
Dies: Shapes: Circles (CSS)

Accessories: Foam Dots, Purple Gems, Stamping Sponge, Scoring Board

Read more...
Related Posts with Thumbnails

  © Free Blogger Templates Columnus by Ourblogtemplates.com 2008

Back to TOP