My Official Holiday Card & A Giveaway!

Thursday, December 22, 2011


Well, well, well.  Did you think I was ever coming back?  It has seriously been a while.  I've noticed that a lot of the blogs I follow haven't been posting much either.  Boy, I would just love to sit at my craft table and craft and blog to my hearts content, but things have been a little hectic and overwhelming at the moment, like I'm sure it is for you too.  Also, my computer got a nasty virus and my husband finally had enough of it, so we bought a Mac.  I'm in love with it, but still learning how to do some basic things.  


So, today I'm finally sharing my official Christmas card for 2011.  The last of them went out yesterday so it's safe to share them here.  


For those of you that are not into card making, you may think that making your own holiday cards are cheaper than buying them, but we card makers know that this is not the case.  I really don't even want to think about the money that went into these babies, much less all the time and energy.  I made 80 cards.  Yup, 80!  


Here's the breakdown:
-Card stock: Two packs of light blue, 1 pack of navy, 1 pack of white
-Ink: Navy ink pad, Watermark ink pad (only because the kids played with mine and got eb powder on it.)
-Embossing Powder
-Envelopes 
-2 Stamps Sets from PTI (eek, that was a big one)
-Photos printed of my kids to go inside each card


I'm not going to put a dollar figure on this because quite frankly, I don't want to think about it.


So, here it is!  Unfortunately you really can't see the lights so well.  I tweaked and tweaked this photo and couldn't get them any darker without throwing off the other colors.  The light bulbs are the exact color of the card base (trendsetter blue from CSS).  If you think this card looks a little familiar, it's a CASE of this card by Nichole Heady.  I changed the colors and type of lights, but the layout and stamp placement is the same.
Here's a close-up so you can see the shiny silver embossing and you can see the light blue bulbs a little bit better.


Things I have learned from making Christmas cards this year:
-People will not appreciate that each light bulb was individually stamped, they don't know this and you can't assume they do.  
-Heat embossing gives a really elegant look to your card, but you will wish you didn't do it in the first place at around card number 7, or after you've gotten the heat gun a little close your fingers one time too many.
-Starting your cards on December 3rd is not good.  You'll be working on cards every night when you are supposed to be in the couch snuggling with your husband, unwinding after a stressful day of Christmas shopping. (I think I'm going to start in February this year.  Okay, somebody please remind me I said this when February rolls around).
-Try to use stamp sets you already own or borrow one from stamping friends so you can eliminate that large cost
-Get a family picture taken by a professional so you don't end up with a photo like this one that you took yourself:
(Don't worry, I didn't use this one)

I will be taking all this into consideration when choosing my card for next year.


If you'd like to see the cards I've sent out in years past, you can check them out right here: 2010, 2009, and 2008.


Giveway
So, since I've been doing all this talk about getting ahead.  I thought I would help you get ahead for next year by giving one lucky commenter the 8 cards that I had leftover.  That is, as long as you are okay sending out a card that someone else made.  All you need to do is leave a comment before the end of the year saying how much you missed me while I was gone anything.  I'll announce the winner on Jan. 1st.  

Have a great day and Happy Holidays if I don't make it back on here before Christmas!!!

{Christmas Card 2011}
Stamps: Holiday Lights, Stylish Sentiments: Holiday
Card Stock: Trendsetter Blue, True Blue Fan, A Blanc Check (CSS)
Ink: True Blue Fan, From an Anonymous Source, Trendsetter Blue (CSS)
Accessories: Silver Detail Embossing Powder, Foam Dimensionals

Read more...

Clear & Simple Stamps: Group Project

Tuesday, December 13, 2011

Hi there!  It's the last Clear & Simple Stamps Group Project of the Year.  This was a fun challenge and I can't wait to see what CSS has in store for us next year.  This month the Design Team was challenged to create a set of cards using the new limited edition set, Celebrate.  Details on how to get the set can be found here.  

I made a set of card with the same basic design, I just switched up the colors and image panel on each card.  I used the limited edition Celebrate stamp set for the sentiment and then I used the Taglines set for the images.  Here are my supplies:
And here are the the finished set of cards.  The images are popped up on foam dimensionals and most were colored using an aqua-painter and ink.


Be sure to check out the rest of the design team and their amazing creations:


Have a great day!

Read more...

An {Elf Quote} Holiday Card...

Monday, December 12, 2011

Hello!  I hope this finds you all well and rested from the weekend.  I have a simple card to share with you today.  I love making one layer cards but find them to be frustrating.  I think I like the challenge and the zero margin of error that comes along with one layer cards.
This sentiment is a quote from the movie "ELF" and I love it!  I think I've only seen the movie once but I love this quote.  The original sentiment has a solid line on both sides of the word "is", and I just extended that line and made a few of my own lines. I think it looked good with just the sentiment and lines, but I thought it needed a little something, and that is the frustrating part.  Did I go too far, is it just right?  Hmmm.

I've been hard at work on this year's Christmas cards, all 80 of them!  There's one part that is very time consuming and it's the silver embossed sentiment--for 80 cards!  I'm crazy!  I think I have about 25 done.

Have a great day!

{Elf Quote Card}
Stamps: Stylish Sentiments: Holiday (Papertrey Ink), Taglines (Clear & Simple Stamps)
Card Stock: Kraft Like a Rockstar (CSS)
InkPerfect Little Black Dress, Dare to Be a Diva Red (CSS)
Accessories: Black Pen, Ruler, Clear & Red Rhinestones

Read more...

Holiday Gifts & Tags

Friday, December 9, 2011

Happy Friday!  I'm so excited to be giving my first gifts of the season tonight.  Every December I go out to dinner with my three girl friends and we always exchange gifts.  Nothing big, just a little something.  


I always like to give something handmade and this year was no different.  This year I crocheted  them each a scarf.  I chose yarn that was really soft and chunky, it was a little hard to work with but I love the end result. I actually had all three of these made before Thanksgiving.  Since I usually give them baked goods, I thought I would throw something edible in with their scarf.

 My Aunt Patty always says that presentation is everything, so I made sure I paid attention to all the details and didn't just throw everything in a gift bag.  I wrapped each scarf around the box of hot chocolate and then tied everything in place with some twine (not card making twine, this stuff is heavy duty).
Then I made them each a personalized tag.  I used the Clear & Simple Stamps set Trendy Tags and  Icons I.  Then I dug out some letter stickers that I've had lying around forever.  


What do you think?  Hopefully they'll love it and all the effort put in to making it look nice.  


Have a great day!

{Holiday Tags}
Stamps: Trendy Tags, Icons I (Clear & Simple Stamps)
Card Stock: Kraft Like a Rockstar (CSS)
Patterned Paper: TC Garden Cottage (K & Co)
Ink: Perfect Little Black Dress (CSS)
Accessories: Letter Stickers, Foam Dimensionals, Clear Gems, Sheer Ribbon

Read more...

A {Celebrate} Card...

Thursday, December 8, 2011


Hello! I'm getting a late start today.  I made this little card earlier today and then ran out the door.  I have a few minutes before we do homework, eat dinner and head to basketball practice.  It's been like this every day this week.

Anywho, here's my card!  It's sorta elegant.  The main blue panel is scored using my Martha Stewart scoring board, it's popped up on dimensionals and lightly sponged to bring out the texture.  I used the same patterned paper for the heart that I did for the flower, they are just opposite sides of the paper, so you know they coordinate.  Love that!
Here's another view so you can see the depth in the heart and popped up layers of the sentiment and smaller heart.  The center of the flower is actually a clear rhinestone that I colored with a blue copic marker.  I absolutely love that trick.  It's really saved my from buying every color rhinestone imaginable.  


Have a great day!

{Celebrate}
Stamps: Celebrate (Clear & Simple Stamps)
Card Stock: True Blue Fan, Trendsetter Blue, Kraft Like a Rockstar (CSS)
Patterned Paper: TC Cottage Garden (K & Co.)
Ink: Your Style Blue Me Away (CSS)
Accessories: Stamping Sponge, Foam Dimensionals, Heart Punches (Paper Shapers), Flower Punch, Clear Rhinestone

Read more...

A {Thanks for Being a Deer} Card....

Monday, December 5, 2011

Hey guys!  It's been a while, right?  Well, I didn't share here on the blog, but I've been looking for a part time job since my kids are both in school.  I was hired to be a substitute teacher and substitute para-educator (teacher's assistant) in my kids' school district.  A lot of it is last minute when a teacher is sick, so that's what happened on Friday.   I worked with a group of autistic kids and I have to say that a really enjoyed it.  I was really nervous since I don't know a lot about autism, but I think I did fine and the day went smoothly.  I'm really looking forward to doing it again, although it sounds weird that I'm hoping that the regular teachers get sick, LOL.

Anyway, enough chatter from me, let's get down to business.  I made this card this morning, no person in mind and it doesn't use any challenges.  This is just where my crafty mood took me.  I've been really attracted to cards lately where the sentiment and image overlap.
I used a paper piercer to puncture a hole in the corners of the cream rectangle and then threaded the brown floss through.  


Have a great day!

{Thanks for being a deer}
Stamps: Forest Friends (Papertrey Ink)
Card Stock: Kraft Like a Rockstar, On the Catwalk Cream (CSS)
Patterned Paper: Ancestry (K & Co)
Ink: Glamazon Green, Brown Leather Satchel, Dish All the Dirt Brown (CSS)
Accessories: Floss, Stamping Sponge

Read more...

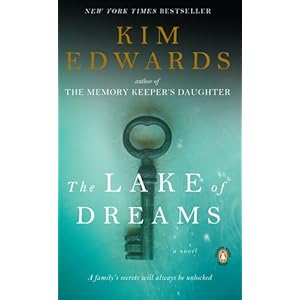
Blogher Book Review: The Lake of Dreams

Thursday, December 1, 2011

The Lake of Dreams: A Novel
Hi there!  I'm here with another BlogHer book review for the BlogHer Book Club.  I like to read just as much as I like to craft.  This next selection is The Lake of Dreams by: Kim Edwards.  You may remember her from the widely popular The Memory Keepers Daughter.  I did not read the that book, so I can't really make a comparison.  However, this book is a continuation of the Edwards' first book.  


This book starts out ten years after the first book ends.  The main character Lucy is living in Japan and she moves home after her mom was injured in an accident.  Her father had passed away in a fishing accident and she sees how her mom and her brother have moved on with their lives.  Her family home is need of repair and she finds some evidence around the dilapidated house that refutes what she thought she knew about her family.  It only gets juicier from there, especially when she gets in tough with an old flame.

Check out the discussions at BlogHer and join in.  We'd love to hear what you think!

Have a great day!

Read more...

Clear & Simple Stamps: December Release

Happy December!  Clear & Simple Stamps is releasing a limited edition sentiment and stamp set this month. Purchase from the CSS online store between now and the end of the year to receive your FREE "Celebrate the Season" sentiment stamp.
Purchases over $100 will receive a full Limited Edition "Celebrate" stamps set.
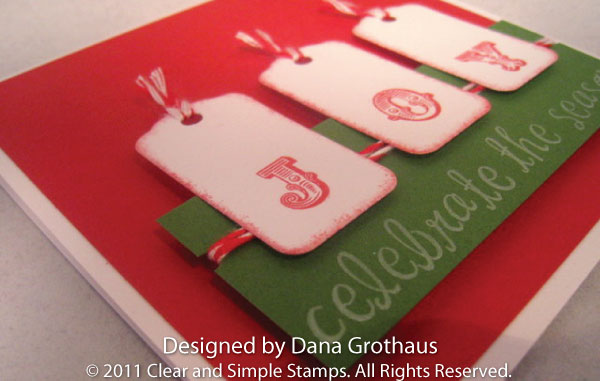
My first release card shows the limited edition sentiment stamp paired with the Alpha Blocks II stamp set.    
I really love the traditional Christmas colors of green and red.  I used three die cut tags arranged vertically to spell JOY.  In this next photo you can see the layering.  
I especially like the baker's twine, how it's on the tags but also you see a peek of it under the tags.  I'm on love with the font used in the sentiment, it has a hint of whimsy.  


Be sure to check out the rest of the Design Team projects.  You will be amazed at the versatility of this set.  


Thanks for CELEBRATING this release with me!

{Celebrate the Season}
Stamps: Celebrate, Alpha Blocks II (Clear & Simple Stamps)
Card Stock: A Blanc Check, Glamazon Green, Dare to Be a Diva Red (CSS)
Ink: Dare to Be a Diva Red (CSS), White
Accessories: Tags Die 1 (CSS), Mini Hole Punch, Baker's Twine, Foam Dimensionals, Stamping Sponge

Read more...
Related Posts with Thumbnails

  © Free Blogger Templates Columnus by Ourblogtemplates.com 2008

Back to TOP