A Simple {Happy Birthday} Card...

Wednesday, June 29, 2011

Hey guys!  Just a simple card for you today.  Sometimes those are the best kind.  This card would be really easy to duplicate but it took me quite a while to put it together.   I was having one of those mojo-less days where nothing seemed to look right.  It all started to finally come together when I added a pop of yellow.  I even did the "triangle" thing where it's more pleasing to the eye to have your pop of color make a triangle (rhinestones, button, butterfly).  Hopefully you think this is pleasing to your eyes.

The butterfly has an antennae, but you can only see one in the photo but that's just because of the angle.  Believe me, this is an anatomically correct butterfly, lol :)

Have a great day!

{Happy Birthday}
Stamps: Communique Sentiments (Papertrey Ink)
Card Stock: SS White (PTI)
Patterned Paper: Gertie (My Mind's Eye)
Ink: Dare to Be a Diva Red (CSS)
Accessories: Butterfly Punch (Martha Stewart), Red Floss (DMC), Button, Scallop Edge Punch (SU), Yellow Rhinestones, Stamping Sponge

Read more...

A {Celebrate Your Day} Card...

Tuesday, June 28, 2011

Hi all! I thought I would make a card for PTI's Make It Monday Challenge.  I think this'll be one of my new weekly challenges.   This week the challenge was to make a card using a two-step masking technique.  First you mask the center rectangle to create the outside frame, then you mask the outside frame to stamp in the center.  Nichole shows some shortcuts in her video that I wouldn't have thought to do.  It's always worthwhile to watch the video even if you are familiar with the technique.  I learn something new every week.

Like the card I made last week, I used a background text stamp to make the frame.  I masked off the frame and stamped the flower, then masked the flower to stamp the leaves.  There's a lot of masking going on!!!
The flower and leaves were colored with ink and an aqua-painter.  I did it quickly and it does look like watercolor.  I applied a red rhinestone to the center of the flower and then outlined it with some smaller clear rhinestones.  


I'm starting to love these one layer cards.  It's really getting me out of my comfort zone in a good way.  


Have a great day!

{Celebrate Your Day}
Stamps: Signature Greetings, Text Style, Friends 'Til the End (Papertrey Ink)
Card Stock: SS White (PTI)
Ink: Green With Envy, Dare to Be a Diva Red, Brown Leather Satchel, Dish All the Dirt Brown (CSS)
Accessories: Red Rhinestone (Kaiser Craft), Clear Rhinestones (Michaels), Aqua-Painter, Stamping Sponge

Read more...

A Baby {Congrats} Card...

Friday, June 24, 2011

Hi-ya friends!  I'm so happy it's Friday, I'm sure you are too.  I have a quick and easy baby card for you today. I think this one looks a little more boy-ish than girl-ish, but you can be the judge.


I was wanting to play with my copics today and was looking through my stamps to see what I had that could be colored in.  Well, I don't think I've ever used this little lion stamp so that was perfect.  I used three shades of yellow to color him in.  

This card is pretty self explanatory so no need for any long-winded explanation from me.  As always, if you have any questions feel free to leave them in the comments.  I love comments!

Have a great weekend!

{Congrats}
Stamps: Precious Baby Boy (Hero Arts), A Guy Thing (Clear & Simple Stamps)
Card Stock: Creamsicle Cardigan, On the Catwalk Cream (CSS)
Patterned Paper: Gertie (My Mind's Eye)
Ink: Perfect Little Black Dress, Simply Blue-tiful (CSS)
Accessories: Orange Floss, Corner Rounder Punch, Foam Dimensionals, Copic Trio of Markers (Y32, Y35, Y38)

Read more...

A {So Sweet of You} Card...

Thursday, June 23, 2011

Hello!  Well, I wasn't planning on making another card for PTI's Make-It-Monday Challenge, but I just couldn't get the idea of this card out of my head.  Like the card I posted on Monday, this card uses reverse masking.  I used the largest Labels 9 Spellbinder die to create a template (or stencil) with printer paper.  Once the I had the template in place, I stamped the text background in red and then sponged red around edges, lighter toward the center.
I picked up some new rhinestones at Micheal's the other day.  These are iridescent, which is a little hard to see in the photo. I love that they'll go with any card.  So fun!

Have a great day!

{So Sweet of You}
Stamps: Signature Greetings, Text Style (Papertrey Ink)
Card Stock: Kraft, Pure Poppy (PTI)
Ink: Dare to Be a Diva Red (CSS), Vintage Cream (PTI)
Accessories: Rhinestones (Michaels), Labels 9 Nesties (Spellbinders), Baker's Twine

Read more...

A {Love Birds} Card...

Wednesday, June 22, 2011

Hi there!  I simply cannot get enough of the Tweet Notes stamp set.  It's just too cute and perfect for any occasion.  This card is pretty clean and simple, but I did do some paper piecing.  I used some paper from the Gertie collection from My Mind's Eye, so I know all my papers would coordinate.  The birds and the leaves are paper pieced. I stamped the branch on right first and then turned my branch around and stamped it again on the left side.    
The birds are popped up on foam dimensionals for added interest.  The sentiment is an outline and it was colored in with an aqua painter and some Paint the Town Pink ink.

Thank you so much for dropping by today.  Hope your day is great!

{Love Birds}
Stamps: Tweet Notes (Clear & Simple Stamps)
Card Stock: Kraft Like a Rockstar, On the Catwalk Cream (CSS)
Patterned Paper: Gertie (My Mind's Eye)
Ink: Perfect Little Black Dress, Paint the Town Pink, Dish All the Dirt Brown, Green With Envy (CSS)
Accessories: Top Note Die (SU), Aqua Painter, Foam Dimensionals, Stamping Sponge

Read more...

A {Thank You} Card...

Monday, June 20, 2011

Hi!  We've had storms this morning and my kids totally subdued.  I've been taking advantage of that have been getting things done around the house.  So, this card is for this week's PTI Make-It-Monday Challenge.  I have found that even if I'm familiar with the technique, I still learn something new from watching the video.  In this one Erin showed how to make your edges of the reverse mask more defined by inking the edges.  


My card actually used two masking techniques.  First I cut out a rectangle of printer paper, placed it in the center and stamped text over it.  When I removed the mask I was left with a blank rectangle in the center of my card.  I used reverse masking for the red heart.  I punched a heart from some printer paper, used the reverse punch (paper with heart punched out of it) and stamped the flower image in the heart.  I then sponged some red ink lightly all over the heart.  Then I removed the printer paper.  
This card was so close to be one layer!  I couldn't help it to add that blue heart.  I decided to add a frame to clearly define the rectangle.  I used a plain old black ballpoint pen and ruler.  


Have a great day!

{Thank You}
Stamps: Friends 'Til The End, Text Style, Signature Greetings (Papertrey Ink)
Card Stock: SS White (PTI), Simply Blue-tiful (CSS)
Ink: Simply Blue-tiful, Perfect Little Black Dress, Dare to Be a Diva Red (CSS)
Accessories: Heart Punches (Paper Shapers), Ruler, Black Pen, Foam Dimensionals, Red Rhinestone (Kaiser Craft)

Read more...

A Butterfly {Birthday Wishes} Card...

Friday, June 17, 2011

Hello & TGIF!  I am totally pumped because I just bought tickets for Papertrey Ink's Stamp-A-Faire!  Is anyone else going?  It's in Cincinnati which is about 20 minutes away for me.  I'm so thankful I was able to buy them as soon as they went on sale since they sold out in about a half an hour.  So far it's me, my crafty sister-in-law Carrie and our equally crafty friend Katie.  


I thought I would take another stab at Papertrey's Make It Monday challenge to use the rock-n-roll technique.  Here's the card I made a few days ago.   This time I used the rock-n-roll technique on the spotted butterfly.   The center is pink and the edges are purple.  You can click on the photo see view it larger.  
I also tried a technique Lisa Johnson showed in the video for trimming around the butterflies.  That is pretty neat and I will definitely be trying that again.  


This stamp set, Butterfly Kisses was my very first PTI purchase.  It felt nice to use it again.  

Have a great day!

{Birthday Wishes}
Stamps: Butterfly Kisses (Papertrey Ink)
Card Stock: Simply Blue-tiful, Kraft Like a Rockstar, A Blanc Check (CSS)
Ink: Paint the Town Pink, VIP Purple, Dish All the Dirt Brown (CSS)
Accessories: Edge Distresser, Foam Dimensionals, Spiral Notebook Die (PTI), Baker's Twine, Lavender Rhinestones (Kaiser Craft)

Read more...

A {Welcome, Baby} Card...

Thursday, June 16, 2011

Hey all!  Just a really quick post from me today.  We are headed out the door to the Kentucky Horse Park.  It's our first time and I'm hoping it's going to be a lot of fun.  


I made this card yesterday.  I've been making a lot of baby boy cards lately since our family is expecting four baby boys to be born in the next few months.  Anyway, I thought it would be nice to make a baby girl card for a change.  I'll just keep it in my stash until needed.  
Thanks so much for the visit today!  Have a great day!

{Welcome, Baby}
Stamps: Whale Wishes (Papertrey Ink)
Card Stock: I'm a Princess Pink (CSS), Vintage Cream, Lemon Tart (PTI)
Patterned Paper: Gertie (My Mind's Eye)
Ink: Paint the Town Pink, Simply Blue-tiful (CSS)
Accessories: Whale Wishes Die (PTI), Oval Nestabilities Die (Spellbinders), Stamping Sponge, Pink Floss (DMC), Foam Dimensionals

Read more...

A {Tweet Little One} Card...

Wednesday, June 15, 2011

Hello!  It's a rainy day here but I had a perfect morning.  My husband is taking a mini vacation and we both slept in, drank our coffee and read the news on our ipads.  The kids have been lazy today, recovering from the 12 hours we spent at Kings Island yesterday.  I was able to steal some uninterrupted time in my studio.  Such a laid back day. 


I was in the mood to make a clean and simple card.  I decided to create a scene using Tweet Notes.  This set is perfect for baby cards.  I really like how the branches are crossed and provide a perfect place for a nest.  
I used blue copic markers for the birds.  The two larger birds were stamped on white card stock and cut out with scissors then glued on top of the branches.  I stamped the nest first and then the cracked egg. I masked the egg and then stamped the baby bird so it's peeking out of the egg.  Since I don't have green copics (yet!) I used some green ink and a colorless blender copic marker.  I'm sure if that's an actual technique or not and as I was doing it I was thinking "I hope I'm doing this right and not ruining my marker".  I think the green looks good on my card.  I rubbed the blender pen on some scrap paper to remove the green.

Thanks so much for joining me here today!  I'm wishing you a relaxing day!!!

{Tweet Little One}
Stamps: Tweet Notes (Clear & Simple Stamps)
Card Stock: A Blanc Check (CSS)
Ink: Perfect Little Black Dress, Green With Envy, Dish All the Dirt Brown, Brown Leather Satchel (CSS)
Accessories: Blue Trio 6 Copic Markers (B93, B95, B99), Colorless Blender Copic, Baker's Twine (May Arts)

Read more...

Clear & Simple Stamps: Group Project

Tuesday, June 14, 2011

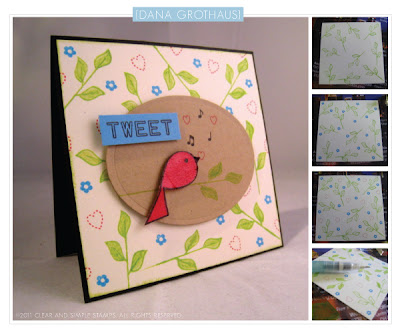
Hello!  Today is our group challenge from Clear & Simple Stamps.  This month's challenge was super fun.  It was to use the new set, Tweet Notes, to create a background on a card.  I will walk you through it step by step.  
First I started with a piece of square On the Catwalk Cream card stock.  I inked up the leaf image with Green With Envy ink and stamped it randomly as shown below.
Next I added the flowers using Simply Blue-tiful ink, as shown below.
Then I added the hearts using Dare to Be a Diva Red ink.
I took my aqua-painter and some Green With Envy ink and colored in the leaves of the branches.
Here's how my card looks all put together.  The leaves on the branch were also colored in using an aqua-painter and Green With Envy Ink.  I love the music notes that come with this set!  Did you notice that my birdy looks a little shiny?  Well, I gave her a quick coat of glossy accents before adhering her to the card.  
Here's another look of the main image panel.  
Be sure to check out the Clear & Simple Stamps Blog to see all the design team creations.  You won't want to miss it!  


I hope you've enjoyed group post day.  I really had a great time using so many images to create a fun background.  Have a great day!
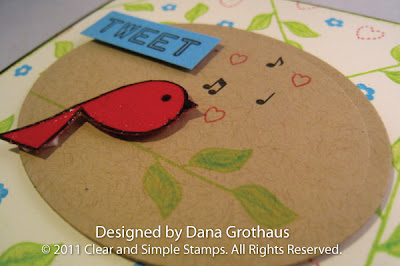
{Tweet}
Stamps: Tweet Notes (Clear & Simple Stamps)
Card Stock: Kraft Like a Rockstar, On the Catwalk Cream, Perfect Little Black Dress, Simply Blue-tiful, Dare to Be a Diva Red (CSS)
Ink: Green With Envy, Perfect Little Black Dress, Simply Blue-tiful, Dare to Be a Diva Red 
Accessories: Foam Dimensionals, Oval Nestablilities (Spellbinders), Aqua-Painter, Stamping Sponge, Glossy Accents 

Read more...

A {Whale of a Happy Birthday} Card...

Monday, June 13, 2011

Hello and happy Monday!!!  I hope you are having a great day.  So far so good here.  I was so excited to play with some new stamping goodies this morning.  I ordered two new stamp sets from Papertrey Ink.  The sets are Whale Wishes and Chevron Stripes.  I'm loving them both.  To tell you the truth I had not thought to use these two sets together, but it just made sense when I sat down in my studio.  The chevron stripes give the  feeling of waves which is a perfect background for the whale stamp.

This week's Make it Monday challenge from Papertrey Ink is to use the rock-n-roll technique where you roll darker ink along the perimeter of your stamp.  I did mine a little differently than the video on the PTI blog.  I tried it their way first but my ink dried to quickly.  So, I stamped the whale first using Simply Blue-tiful ink and then I cleaned off the stamp and then stamped the whale once again (on top of the first one) with the whale inked with Your Style Blue Me Away ink around the perimeter.  I really like the effect.


I have to say that I'm loving the chevron stripes.  They are so forgiving.  If your stamp is off a bit, you won't be able to tell in the long run.  These are so much fun.  

Have a great day!

{Whale of a Happy Birthday}
Stamps: Whale Wishes, Chevron Stripes (Papertrey Ink)
Card Stock: On the Catwalk Cream, Kraft Like a Rockstar, Your Style Blue Me Away (CSS)
Ink: Vintage Cream (PTI), Simply Blue-tiful, Your Style Blue Me Away (CSS)
Accessories: Whale Wishes Die (PTI), Foam Dimensionals, Oval Nestabilities (Spellbinders), Stamping Sponge

Read more...

A {Birthday Greetings} Card Re-Do...

Friday, June 10, 2011

Hey guys!  I have one more card re-do to show you.  This is another one from 2008.  Click here to see the original post (including a trip down memory lane when my daughter graduated from preschool).  I think the end result is better than the original card, but I'm not in love with it. I don't know, I think it might be too far from my style.  
Original Card 2008
Updated Card 2011
I pretty much just changed the paper, the flower is the same style but punched from paper.  I decided to not round the edges of the sentiment panel and instead I distressed all the edges.  I added a yellow pearl in the corner.  
I think this card is just a lit bit too busy for my liking.  I think this would be a great card for a girly girl.  

That being said, I have to tell you that it's not very often I use a paper pad until nothing is left but little scraps.  Well, that's what happened with the pad of paper I used for this card.  It's from the Gertie (Stella Rose) collection from My Mind's Eye.  I think I only have one full sheet left.  I love that MME's papers are double sided.  If you don't like one side, most likely you'll love the other side.

Have a great weekend!!!

{Birthday Greetings}
Stamps: Icon Extras (Clear & Simple Stamps)
Card Stock: Simply Blue-tiful, Paint the Town Pink (CSS)
Patterned Paper: Gertie (My Mind's Eye)
Ink: Simply Blue-tiful (CSS)
Accessories: Pearl, Yellow Ribbon, Flower Punch (Paper Shapers), Circle Punch (SU), Scallop Edge Punch (SU), Edge Distresser, Foam Dimensionals, Stamping Sponge

Read more...

A {Congrats} Card Re-Do...

Thursday, June 9, 2011

Hello again!  I have another card re-do for you.  I'm telling you, these cards are fun and quick to do.  Once I decided on a card to re-do, the hard part was over.  Well, actually the hardest part was searching for the original blog post where I posted the card I'm re-doing.  I guess I didn't believe in labeling my posts back then.   Click here to see the original post in it's entirety with supply list.
Original Card from 2008
Updated Version 2011
And here's my updated version.  It was made using much better quality card stock and some updated patterned paper.  I decided to round the corners and add a little silver bling, but still keeping the card pretty masculine looking.  Also, the edges are sponged just a little bit.  It drives me nuts to see white edges.  I hope you can tell my skill level with the camera is much improved.  I'm not sure if I even knew how to edit photos back then.

Have a great day!

{Congrats, You Did It!}
Stamps: Signature Greetings (Papertrey Ink)
Card Stock: Kraft Like a Rockstar, Brown Leather Satchel (CSS)
Patterned Paper: Hattie (My Mind's Eye)
Ink: Espresso Your Style, Simply Blue-tiful (CSS)
Accessories: Corner Rounder Punch, Navy Sheer Ribbon (Offray), Silver Pearls (Micheals)

Read more...

Blogher Book Club Review: A Discovery of Witches

Hello there!  Just a quick note that I another book review posted today on the Blogher Book Club site.  This one is for A Discovery of Witches by Deborah Harkness. Click here to check it out.  Thanks!

I'll be back shortly with a card to share!

Read more...

A {Welcome Summer} Card Re-do...

Tuesday, June 7, 2011

Hey guys!  I'm almost embarrassed showing my face today.  I can't believe it's been 6 days since I've posted anything.  It was a totally unscheduled break.  For some reason, the last few weeks of the school year are always crazy busy and this year wasn't any different.  When I had time to be creative, I was exhausted.  I know you guys understand.

So, I was getting some cards ready on Monday (63 to be exact) to submit to CARDS Magazine (hopefully at least one will be accepted) and I was looking at some of my really old cards, ones that I would be too embarrassed to give away.  Do you have a stack of those?  Anyway I was thinking it would be fun to re-do some of those cards and see how much better my skill set is now.  Well, the first card I picked was one I made before I began blogging.  It was a Christmas card I made about 60 of and sent out to all of our friends and family.  I really liked the layout, so that's pretty much all I kept the same.
Original Card
Card Re-do
I really do still like the original card.  I love those lightbulbs and how they look like glass (they were covered with glossy accents).  It would be fun if I still had those stamps to make use them, but that was all the way back in 2007.  So, my new card uses 4 stamp sets.  I didn't have that luxury back in the day.  If you are having a hard time reading the sentiment, it says "Welcome Summer", which we finally are doing.  


The major differences are the stamps used and the overall feel of the card.   I replaced the brads with buttons, used some edge distressing, added a little interest around the sentiment (they are little cream leaves).  I left the ribbon off completely   
Original Card
Card Re-do
I also added some dimension to this card by using foam dimensional adhesive behind the leaf squares.  


I hope you thought today's post was fun.  Hopefully I make-over a few other cards.  It's fun to see how we've all evolved in this little crafty world.  

Have a great day!

{Welcome Summer}
Stamps: Icons I, Happy Fall (Clear & Simple Stamps)Wreath for All Seasons, Text Style (Papertrey Ink)
Card Stock: Kraft Like a Rockstar, Glamazon Green, A Blanc Check (CSS)
Ink: Green With Envy (CSS), Vintage Cream (PTI)
Accessories: Buttons (PTI), Edge Distresser, Foam Dimensionals, 

Read more...
Related Posts with Thumbnails

  © Free Blogger Templates Columnus by Ourblogtemplates.com 2008

Back to TOP