Showing posts with label Limited Edition JOY. Show all posts

CSS Group Project: Joyful Resolution

Wednesday, December 26, 2012


Hello!  I have a super fun project to share with you today.  It's group project day for Clear & Simple Stamps and today we are sharing a New Year's favor along with a crafty resolution for the new year. 
I had so much fun making this wine tag.  As soon as I had the idea of using the champagne class for the #1, I was ready to go!  It's funny how it takes just a little something for my mind to go into overdrive.  
I started with a strip of card stock about 7" long and a little less than 2" wide.  I used a circle die from Shapes: Circles to make the opening that would slide over the wine bottle neck.  I stamped it using the woodgrain stamp from Background Basics 1.   The label itself uses a frame Label Frames 1 stamped using Dare to Be a Diva Red ink and then cut out.  I added some diagonal pink lines using Designer Lines.  That cute little wine glass is from Taglines and is colored using copic markers.  The die cut numbers were adhered using foam dots, so they literally pop off the label.  The sentiment is from the Limited Edition set JOY.  
As far as my crafty resolution is concerned, it's all about organization.  From keeping a blog agenda, scheduling more posts,  handing in projects before the deadline, to keeping my studio space neat and tidy.    

Be sure to check out the designers projects and resolutions:


Have a great day! 

{NYE Wine Tag}
Stamps: Background Basics, Label Frames 1, Designer Lines, LE Joy, Taglines (Clear & Simple Stamps)
Card Stock: Kraft Like a Rockstar, A Blanc Check (CSS)
Ink: Perfect Little Black Dress, Dish All the Dirt Brown, Dare to Be a Diva Red, I'm a Princess Pink (CSS)
Dies: Shapes: Circles, Numbers (CSS) 
Copics: Y32, Y35, W1, 110
Accessories: Foam Dots 

Read more...

CSS Group Project!!!

Tuesday, December 11, 2012


We have a super fun project to share with you today!  The CSS design team and I have been challenged to pick a project from our past that we really liked, and then redo it using the new stamp set, Limited Edition: JOY.

The card I am CASEing is the one above.  It's not the greatest photo, but I just love how it looks in person.  It's a CAS card and I wanted to replicate it for a different occasion.

I happened to need a baby shower card for friends of ours that just adopted a newborn baby girl.  It was one of those showers where you bring a book to start the baby's library.  That's where the idea of using the book from Sweet Dreams came from.  I colored the book using copics.
As you can see, I kept the same layout of the card, just switched the card orientation so that the front panel is longer.  I kept the text on the bottom of the card, but used the test from Sweet Dreams filled with nursery rhymes.
The Limited Edition stamp set, JOY, can be used for many happy occasions.  This is just one example. How do you get this Limited Edition set?  Read all about it on the Clear & Simple Stamps Blog.

Check out the rest of the design team as they replicate one of their favorite CSS projects using the new JOY stamp set:


Have a great day!

{A Bundle of Joy}
Stamps: Limited Edition JOY, Sweet Dreams (Clear & Simple Stamps)
Card Stock: I'm a Princess Pink, Paint the Town Pink, Cre'me de la Cream (CSS)
Ink: Perfect Little Black Dress, Paint the Town Pink (CSS)
Accessories: Foam Dots
Copic Markers: W1, W3, R83, R85

Read more...

CSS Customer Appreciation Month!!!

Tuesday, December 4, 2012


Hello, hello!  I have some exciting new to share today.  December is Clear & Simple Stamps Customer Appreciation Month!  During this time they release a new year-end Limited Edition stamp set.  This set is not for sale, for details on how the stamp set is earned (it is earned in increments), please visit the Clear & Simple Stamps Blog.  

Here is the stamp set: 
Isn't it FAB? As you can see it focuses on JOY, but not just holiday joy.  This set can be used year round and I will show you that throughout the month.

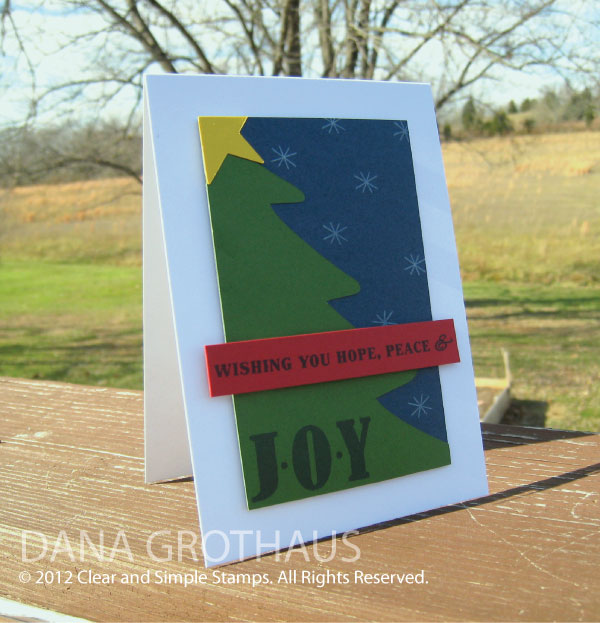
If you've been hanging out around these parts for a while, you know that I make Christmas cards every year.  I usually make about 75 and work on them over the course of a couple months.  Not so this year! I made my cards in three days!!!  It really helped that the kids were in school all day and I had big chunks of time to dedicate to the task.

Here's my process:

  • First things first.  You need a prototype.  Once I figured out what my card was going to look like (above), I could start cutting all the components.  
  • I cut these trees out on my Silhouette.  They perform double duty.  Since you only see the right side of the tree, I cut the tree down the center and then took the left side and flipped it over.  That way I only needed to cut out half the amount of trees and it was less wasteful that way too.  
  • I cut the stars out on the Silhouette as well.    
  • Here's all the paper items I needed to assemble the center panel.  
  • I started off by using adhesive to apply the tree, then I trimmed the edges off the top and bottom of the tree.

  • Then I adhered the star using liquid glue.

  • Here they are all spread out.

  • While I was waiting for the glue to dry on the stars, I stamped the sentiment "Wishing You Hope, Peace &" on the red strip.


  • It's very important to do this in front of the TV to stave off boredom.  I did all my holiday card making on the coffee table in my living room, not in my studio.


  •  Once the stars were dry, I trimmed off the excess. 

  • I must have forgotten to photograph the next part, but I stamped the word "JOY" on each tree base.  
  • Then I stamped the snow.  I used white ink and little snowflake stamp from the stamp set "Taglines".

  • All that was left now is to apply the red sentiment strip with foam dots and then adhere the entire panel to a white card base using more foam dots.  
  • I cut and scored all of the card bases a few weeks ago at a girls craft night.  At that point I had no idea what my card would look like, but white card stock for the base was a pretty safe choice.

  • Here's what they look like all spread out on my coffee table, all 74 of them!  (I'm missing one because my first prototype was a disaster).
Clear & Simple Stamps is also releasing metallic card stock, envelopes, ribbon and gift wrap!  Just in time for you to make holiday cards and to decorate gifts.  They come is gold, silver, and a shiny white.

I can't wait for you to see what the other designers have created with the new, limited edition JOY stamp set!  You won't want to miss it.  


Have a great day!

{Wishing You Hope, Peace & Joy}
Stamps: Limited Edition JOY, Taglines (Clear & Simple Stamps)
Card Stock: A Blanc Check, Glamazon Green, True Blue Fan, Say Yellow to All Your Fans, Dare to Be a Diva Red (CSS)
Ink: True Blue Fan (CSS), White
Accessories: Foam Dots, Silhouette Shapes (Tree & Star), Silhouette Machine

Read more...
Related Posts with Thumbnails

  © Free Blogger Templates Columnus by Ourblogtemplates.com 2008

Back to TOP