Showing posts with label signature greetings. Show all posts

A {Gratitude} Card...

Friday, October 5, 2012

Hey guys!  I have a fun one layer card to share with you today.  Don't be deceived, this card looks simple, but it was a lot of work.  

I started with a kraft card base measuring 3.5" x 5 (my new favorite card size).  I used a t-square ruler and a pencil to make a grid of squares that were 3/4".  That was really the most time consuming.  

From there I stamped the large and small flowers and then stamped the flower centers.  The flowers are from Papertrey's Iconic Images set and the flower centers come from CSS's Background Basics 2.  

Here's to a great weekend!!! 

{Grateful for You}
Stamps: Signature Greetings, Iconic Images (Papertrey Ink), Background Basics 2 (Clear & Simple Stamps)
Card Stock: Kraft Like a Rockstar (CSS)
Ink: Dish All the Dirt Brown, Glamazon Green, Simply Blue-tiful (CSS)

Read more...

An {I Love You} Card...

Friday, May 4, 2012


I've been really smitten with gray and yellow recently.  I decided to throw some turquoise in the mix today.   The patterned paper that I chose is gray and silver, so kinda shiny.  
It's such a dreary day here, although it's great for taking photos.  I just can't wake up even though I slept great last night.  Maybe too much sleep?  I don't know but I think there is a nap in my future.


Check back tomorrow for the Clear & Simple Stamps release party!
Have a great weekend!!!

{I love you so much}
Stamps: Shapes: Hearts (Clear & Simple Stamps), Signature Greetings (Papertrey Ink)
Card Stock: Say Yellow to All Your Fans, Simply Blue-tiful (CSS)
Patterned Paper: Silver Valley (SEI)
Ink: Perfect Little Black Dress, Simply Blue-tiful (CSS)
Dies: Shapes: Hearts (CSS) 
Accessories: Foam Dots, Stamping Sponge

Read more...

A {Hope this year...} Card...

Monday, April 30, 2012


Happy Monday!  I have a quick and simple card to share with you today to ease into the week.  I used this week's CPS sketch.  It's been a while since I participated in any challenge, but this one was so simple, I couldn't resist.
I started a new board on Pinterest for color combinations that I like.  That is how the color combo came about for this card.  Here's the inspiration photo.
Today was the first time I used my new card stock organizational system and I have to say that I LOVE it!  Having my scraps organized by color and on top of my desk is so handy.


Have a great day!

{Hope this year...}
Stamps: Signature Greetings (Papertrey Ink)
Card Stock: On the Catwalk Cream, Green With Envy, Brown Leather Satchel (CSS)
Ink: Dish All the Dirt Brown (CSS)
Accessories: Birds & Swirls Embossing Folder (Cuttlebug), Foam Dots, Stamping Sponge, Corner Rounder Punch, Mini Hole Punch, Baker's Twine

Read more...

A {Best One Yet} Card...

Wednesday, September 14, 2011

 I made this card yesterday and am just now getting around to posting it.  This card is for my husband.  He goes on a trip to Dale Hollow every year with the men in his family and friends.  It's a tradition that's been going on for about 25 years (he hasn't gone for 25, but his family has).  Anyway, he left yesterday and I tucked this card under his iPad cover for him to discover later.

This card is rather masculine.  The chevron stripes are stamped with brown ink and then I used a regular old marker to color in the stripes with red. I added the white faux stitching last.  It just looked a little boring before that.  The red stitching is real, though.  I hope he likes it.
I added a little dimension to the sentiment panel.  It's a little wavy, like a flag/banner.  


Have a great day!

{Best One Yet}
Stamps: Chevron Stripes, Signature Greetings (Papertrey Ink) 
Card Stock: Kraft Like a Rockstar, On the Catwalk Cream (CSS)
Ink: Dish All the Dirt Brown, Your Style Blue Me Away, Dare to Be a Diva Red (CSS)
Accessories: Sewing Machine, Red Thread, White Gel Pen, Corner Rounder Punch, Stamping Sponge, Red Marker

Read more...

A Simple {Dude, You Rock} Card...

Friday, September 2, 2011

Happy Friday Y'all!  I've been so busy this week that I couldn't wait to get crafty, since that means I get a chance to sit down.  We are having a Labor Day party and I've been cleaning like crazy.  Hopefully the weather will cooperate and it won't be so hot.

So, I really like this card but it just didn't photograph that well.  I changed the settings on my camera, moved the card around (in the shade, in the sun), I don't know what the deal was.  The idea for this card came from one of my favorite designers Cristina Kowalczyk.  You can see her card here.  Don't ya just love it?!


Anyway, this is a loose interpretation of Cristina's card.  I kept the polka dots but stamped them on colored card stock.  I stamped the sentiment in the same spot in black.  You can see I used a different sentiment.  I had to do a little masking with my sentiment.  The "Dude" and "You Rock" are a little closer together on the stamp.  
I made this card with no one in particular in mind, but I chose colors that are guy friendly.  I don't the button is too girly, right?  Buttons are unisex, you think?  


I really like this card and wish you could all see it in person.  


I hope you all have a wonderfully long weekend.  I know I will!!!

{Dude, You Rock!}
Stamps: Signature Greetings, Polka Dot Basics (Papertrey Ink)
Card Stock: SS White, Ripe Avocado, Scarlet Jewel, Orange Zest, Kraft (PTI)
Ink: Fresh Snow (PTI), Perfect Little Black Dress (CSS)
Accessories: Hemp Twine, Button, Corner Rounder Punch, Edge Distresser, Hole Punch

Read more...

A {Thank You} Card...

Thursday, August 4, 2011

This was such a simple card to make.  I discovered that these two dies (top note and labels 9) really fit together well.  I just had to use them on a card.

My wreath is stamped using two colors of green for the berries.  Green berries don't really make sense on a wreath, but papercrafting doesn't have to make sense, right?  I think the buttons really make this card, it gives it a finished look.


Well, that all for me today folks!  Today's going to be a catch-up day.  I'm way behind on quite a few things.  


Have a great day!

{Thank You}
Stamps: Wreath for all Seasons, Signature Greetings (Papertrey Ink)
Card Stock: A Clean Slate, A Blanc Check, Kraft Like a Rockstar (CSS)
Ink: Glamazon Green, A Clean Slate, Dish All the Dirt Brown (CSS)
Accessories: Top Note Die (SU), Labels 9 Die (Spellbinders). Buttons, Floss

Read more...

A {Have a Fabulous Day} Card...

Tuesday, August 2, 2011

Hello there!  The card I'm sharing today is one that I made at the PTI Stamp-a-Faire.  I started with a kraft card base and then cut a rectangle of berry sorbet card stock slightly smaller than the card base.  I used that panel to layer the scallops on.  I started from the bottom adhering the strips of scallops, overlapping them and shifting the scallops so they were offset.  When I was finished, I trimmed the edges.


The gems that go across the top are a new product that I bought at Michaels (they are the Recollections brand) called Bling on a Roll.  They come on a roll just like they are seen on my card.  They are hard to cut apart and are meant to be used in a line.  
When my card was finished I lifted up each scallop to add some dimension.  I used pti card stock and that paper is really thick.  You can see that I didn't get the cleanest cut on my scallops.

Have a great day!

{Hope Your Day is Fabulous}
Stamps: Signature Greetings (Papertrey Ink)
Card Stock: Kraft, Spring Rain, Ripe Avocado, Terracotta Tile, Orange Zest, Berry Sorbet (PTI)
Ink: Your Style Blue Me Away (CSS)
Accessories: Bling on a Roll (Michaels), Corner Rounder Punch, Scallop Edge Punch (SU)

Read more...

A {Congrats} Card...

Friday, July 22, 2011

Here's a quick and fun card I made this morning.  This was my last before packing up my desk and loading up my tote for Papertrey Ink's Stamp-A-Faire.  I'm so excited, can ya tell?


This is a one layer card stamped using a trio of brightly colored inks.  I was somehow able to find coordinating thread in my stash.  I punched little notches with my hole punch to keep them in place.  I really love how it turned out.  I used my very favorite PTI stamp set, Signature Greetings designed by the one and only Dawn McVey, and I'll be hanging out with her tomorrow!!!
I'm all packed and ready to go!  I can't believe I was able to fit everything in there.  The only problem is that I haven't planned anything out.  I have no idea what I'm going to work on.  
Maybe I'll come up with a plan tonight.  I can't believe I'm not going to see my kids for a whole day.  I'll be leaving before they wake up and getting home after they are in bed.  That usually only happens when my husband and I go out of town, not when I'll be 25 minutes away.  


I'm hoping to get a good cell signal at the convention center so I can tweet throughout the day.  Follow me on Twitter by clicking here and then click the "follow" button.  My twitter feed is also on the right hand side of the blog.  Either way I'll be sure to take a bunch of pictures to share on Monday.


Have a great weekend!

{Congrats}
Stamps: Signature Greetings, Chevron Stripes (Papertrey Ink)
Card Stock: SS White (PTI)
Ink: Green With Envy, Coral Necklace, Simply Blue-tiful (CSS)
Accessories: Embroidery Floss, Corner Rounder Punch

Read more...

A {Celebrate Your Day} Card...

Tuesday, June 28, 2011

Hi all! I thought I would make a card for PTI's Make It Monday Challenge.  I think this'll be one of my new weekly challenges.   This week the challenge was to make a card using a two-step masking technique.  First you mask the center rectangle to create the outside frame, then you mask the outside frame to stamp in the center.  Nichole shows some shortcuts in her video that I wouldn't have thought to do.  It's always worthwhile to watch the video even if you are familiar with the technique.  I learn something new every week.

Like the card I made last week, I used a background text stamp to make the frame.  I masked off the frame and stamped the flower, then masked the flower to stamp the leaves.  There's a lot of masking going on!!!
The flower and leaves were colored with ink and an aqua-painter.  I did it quickly and it does look like watercolor.  I applied a red rhinestone to the center of the flower and then outlined it with some smaller clear rhinestones.  


I'm starting to love these one layer cards.  It's really getting me out of my comfort zone in a good way.  


Have a great day!

{Celebrate Your Day}
Stamps: Signature Greetings, Text Style, Friends 'Til the End (Papertrey Ink)
Card Stock: SS White (PTI)
Ink: Green With Envy, Dare to Be a Diva Red, Brown Leather Satchel, Dish All the Dirt Brown (CSS)
Accessories: Red Rhinestone (Kaiser Craft), Clear Rhinestones (Michaels), Aqua-Painter, Stamping Sponge

Read more...

A {So Sweet of You} Card...

Thursday, June 23, 2011

Hello!  Well, I wasn't planning on making another card for PTI's Make-It-Monday Challenge, but I just couldn't get the idea of this card out of my head.  Like the card I posted on Monday, this card uses reverse masking.  I used the largest Labels 9 Spellbinder die to create a template (or stencil) with printer paper.  Once the I had the template in place, I stamped the text background in red and then sponged red around edges, lighter toward the center.
I picked up some new rhinestones at Micheal's the other day.  These are iridescent, which is a little hard to see in the photo. I love that they'll go with any card.  So fun!

Have a great day!

{So Sweet of You}
Stamps: Signature Greetings, Text Style (Papertrey Ink)
Card Stock: Kraft, Pure Poppy (PTI)
Ink: Dare to Be a Diva Red (CSS), Vintage Cream (PTI)
Accessories: Rhinestones (Michaels), Labels 9 Nesties (Spellbinders), Baker's Twine

Read more...

A {Thank You} Card...

Monday, June 20, 2011

Hi!  We've had storms this morning and my kids totally subdued.  I've been taking advantage of that have been getting things done around the house.  So, this card is for this week's PTI Make-It-Monday Challenge.  I have found that even if I'm familiar with the technique, I still learn something new from watching the video.  In this one Erin showed how to make your edges of the reverse mask more defined by inking the edges.  


My card actually used two masking techniques.  First I cut out a rectangle of printer paper, placed it in the center and stamped text over it.  When I removed the mask I was left with a blank rectangle in the center of my card.  I used reverse masking for the red heart.  I punched a heart from some printer paper, used the reverse punch (paper with heart punched out of it) and stamped the flower image in the heart.  I then sponged some red ink lightly all over the heart.  Then I removed the printer paper.  
This card was so close to be one layer!  I couldn't help it to add that blue heart.  I decided to add a frame to clearly define the rectangle.  I used a plain old black ballpoint pen and ruler.  


Have a great day!

{Thank You}
Stamps: Friends 'Til The End, Text Style, Signature Greetings (Papertrey Ink)
Card Stock: SS White (PTI), Simply Blue-tiful (CSS)
Ink: Simply Blue-tiful, Perfect Little Black Dress, Dare to Be a Diva Red (CSS)
Accessories: Heart Punches (Paper Shapers), Ruler, Black Pen, Foam Dimensionals, Red Rhinestone (Kaiser Craft)

Read more...

A {Congrats} Card Re-Do...

Thursday, June 9, 2011

Hello again!  I have another card re-do for you.  I'm telling you, these cards are fun and quick to do.  Once I decided on a card to re-do, the hard part was over.  Well, actually the hardest part was searching for the original blog post where I posted the card I'm re-doing.  I guess I didn't believe in labeling my posts back then.   Click here to see the original post in it's entirety with supply list.
Original Card from 2008
Updated Version 2011
And here's my updated version.  It was made using much better quality card stock and some updated patterned paper.  I decided to round the corners and add a little silver bling, but still keeping the card pretty masculine looking.  Also, the edges are sponged just a little bit.  It drives me nuts to see white edges.  I hope you can tell my skill level with the camera is much improved.  I'm not sure if I even knew how to edit photos back then.

Have a great day!

{Congrats, You Did It!}
Stamps: Signature Greetings (Papertrey Ink)
Card Stock: Kraft Like a Rockstar, Brown Leather Satchel (CSS)
Patterned Paper: Hattie (My Mind's Eye)
Ink: Espresso Your Style, Simply Blue-tiful (CSS)
Accessories: Corner Rounder Punch, Navy Sheer Ribbon (Offray), Silver Pearls (Micheals)

Read more...

A {Baby Congrats} Card...

Monday, May 9, 2011

Hello!  I had so much fun making this card.  I love green, yellow and pink for baby girl cards.  Like I said the other day, there is a baby boom going on in my extended family and I need to be prepared with cards.  This one uses scraps I've already accumulated from the new Gertie line from My Mind's Eye.  
One of my favorite cards to make are the quilted kind.  I just love mixing and matching those papers, just like fabric.  I've been really into layering ovals with the labels 9 die.  I think they are perfect together.


That's all for me today!  Hope you are having a good start to your week!!!

{Baby Congrats}
Stamps: Signature Greetings (Papertrey Ink)
Card Stock: Kraft Like a Rockstar, I'm a Princess Pink (CSS)
Patterned Paper: Gertie (My Mind's Eye)
Ink: Moss Green (Colorbox)
Accessories: Labels 9 & Oval Nestabilities (Spellbinders), Foam Dimensionals, Edge Distresser, 

Read more...

A {Celebrate Your Day} Card...

Wednesday, April 6, 2011

Hey guys!  Now, I know what you are thinking, "Wow, Dana is a real genius with a sewing machine!".  Before you leave your comments of praise, I thought I would "keep it real" as they say.  I have never sewn this much on a card before.  In fact, I'm actually really impressed with all my straight lines.

I started by stamping my kraft base with the grid from the Guidelines set.  This made sewing in a straight line so much easier (except for that one line that really went crooked, but I hid it behind the sentiment panel, yeah, genius is right).  Now, here's the part where I "keep it real".
Yeah, what a mess!  And here's how it looked after I trimmed the thread and taped down the loose ends with scotch tape.
It looks so much better, but who wants to see a card with that on the inside?  So, I took a piece of lightweight card stock and lined the inside.
Now no one will know what a mess it was!

Okay, now that the inside is finished (I'm not big on decorating the inside of cards, outside is where it's at, just sayin'), it's time to work on the outside.
I decided to stamp inside the diamond grid with versamark using one of the images from the Guidelines set.  I decided to do this after the stitching because I would be really upset with myself if I did all that work and then ruined it when my sewing machine messed up (user error) and I would have to start over.  Luckily the sewing machine worked pretty good today.

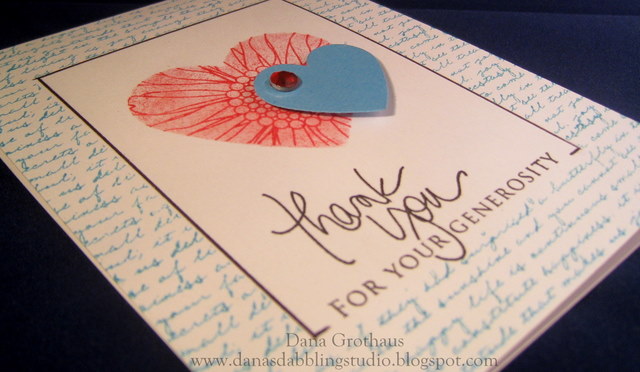
And here is a close up of the sentiment.  Papertrey Ink's Make It Monday Challenge was to use heat embossing on your card.  Gold is one of my favorites.  I just love watching the matte powder turn to a shiny metallic.

The centers of the butterflies are white acrylic accents.

I hope you enjoyed today's card and the quirky mood I'm in.  

{Celebrate Your Day}
Stamps: Guidelines, Signature Greetings (Papertrey Ink)
Card Stock: Kraft, Dark Chocolate (Papertrey Ink)
Ink: Versamark
Accessories: Sewing Machine & Thread, Gold Embossing Powder (SU), Edge Distresser, Foam Dimensionals, Butterflies Punch (Martha Stewart), White Acrylic Accents (Ranger)

Read more...

A {Baby Banner} Card...

Monday, April 4, 2011

Hello!  Hope you had a great weekend.  Ours was super fun.  We crammed some fun stuff in yesterday for the kid's last day of Spring Break.  We saw the movie "Hop" which was pretty cute, for kids anyway.  

Okay, so here is my card for today.  It uses this week's CPS Sketch.  I think I've only done a banner on one other card before so this was a lot of fun (click HERE to see it). For this card I used the other banner shape that came already in my Silhouette library.  I simply cut out the banner shapes using the Silhouette and then punched out some circles with a circle punch (duh, a little redundant!).  
I really love how this card turned out except I wanted the sentiment at the bottom to be darker.  By the time I noticed I had already glued down the patterned paper and had the banner attached.  I was afraid I would ruin the whole card if it didn't stamp perfectly with a darker brown.  Oh well, I think it'll do.  If you are having a hard time reading the sentiment, it says "Congrats on your new little bundle".

Well, hope everything is going your way today.  So far so good here.  It's pretty windy but it is in the high 60's.  I can't wait to plant our first garden sometime this week.  I hope you have a great day!

{Baby Banner Card}
Stamps: Fresh Alphabet, Signature Greetings (Papertrey Ink)
Card Stock: Kraft Like a Rockstar (CSS)
Patterned Paper: Gertie (My Mind's Eye)
Ink: Simply Blue-tiful, Brown Leather Satchel (CSS)
Accessories: Foam Dimensionals, Digitally Cut Banners (Silhouette), Circle Punch, Baker's Twine (Jillibean Soup), Edge Distresser

Read more...

Papertrey Ink: March 2011 Blog Hop

Friday, March 25, 2011

Hello!  Here's my card for this month's Papertrey Ink Blog Hop.  I'm so glad that they now have their blog hops all day long.  I always forget about it until it's too late.  This way I was able to make a card the day of and play along.  This month's challenge was to use embroidery floss on your card in a new way.  I use embroidery floss all the time on my cards, but I wanted to do something different.  This idea actually came to me while I was running on treadmill this afternoon (4 miles, go me!).  

I pulled the colors for the thread and ink from the patterned paper.  To create the "stars" I punched circles in three different sizes.  I used a pencil to first draw a "t" and then an "x" across the circles.  I laid them out on my card and used a paper piercer to pierce the center of the circle and then just outside the lines I created with the pencils.  I removed the circle templates and threaded the floss.  Easy peasy!
I added clear gems for a little added sparkle.  


Thanks so much for stopping by!  I can's wait to start hopping and see everyone's creations with floss. Have a great weekend!!!


Have a great day!

{Girly, You Rock}
Stamps: Signature Greetings (Papertrey Ink)
Card Stock: Kraft (Papertrey Ink)
Patterned Paper: Gertie (My Mind's Eye)
Ink: Green With Envy (CSS)
Accessories: Stamping Sponge, Embroidery Floss, Foam Dimensionals, Clear Rhinestones, Paper Piercer 

Read more...
Related Posts with Thumbnails

  © Free Blogger Templates Columnus by Ourblogtemplates.com 2008

Back to TOP