Showing posts with label PTI Make It Monday. Show all posts

{Hello}...

Monday, May 21, 2012


Hello!  Happy Monday!  Well, I've had strep throat twice in the last two months.  It's been a real bummer.  Luckily I'm the only one that's been afflicted.  I might have to have my tonsils out, blah.

So, my goal for this morning was to make a card while a load of laundry dried and I did it.  This card came together pretty quickly except for the button embellishment.  I just couldn't figure out what I wanted to do with that space before I settled on the button, and then it took a while to tie a perfect bow, due to shaky hands from drinking too much coffee.  
This card was made for this week's PTI Make-It-Monday challenge to use three different pieces of patterned paper on a card.  I used one of my all-time favorite pattern pads that is pretty much all scraps now (Offbeat by Basic Grey).  I knew the the blue floss would work because that color was also included in the paper pack.


Have a great day!

{hello}
Stamps: Communique Sentiments (Papertrey Ink)
Card Stock: Kraft Like A Rockstar (CSS)
Patterned Paper: Offbeat (Basic Grey)
Ink: Perfect Little Black Dress (CSS)
Accessories: Foam Dots, Glue Dots, Floss, Corner Rounder Punch, Large Circle Punch, Button

Read more...

A {Happy Birthday} Card...

Wednesday, May 9, 2012


Good morning!  I think I designed and executed this card half asleep.  I've not slept well the last three nights and our new bed and mattress will be delivered here shortly.  Hopefully there will be a nice nap in my future on a foam mattress that feels like a cloud.
For my card I used a triangle banner image from the new CSS set "Triangle Trinkets".  I penciled a light line where I wanted the banner tops to line up, then I stamped the banner images and then paper pieced the banners.  Then I took a black fine tip marker and drew a short line connecting the banners, they look like they are linked. 
Hope all that made sense since I'm still half asleep (and I've had two cups of coffee).  Thanks for bearing with me.


I'm submitting this PTI's challenge this week to mix up many patterns of scrap paper.


Have a great day!

{Happy Birthday}
Stamps: Around & About Sentiments, Communique Sentiments (PTI), Triangle Trinkets (Clear & Simple Stamps)
Card Stock: A Blanc Check (CSS)
Patterned Paper: Silver Valley (SEI)
Ink: Brilliant Blue, Dare to Be a Diva Red, Perfect Little Black Dress (CSS)
Accessories: Black Fine Tip Pen, Red Floss, Corner Rounder Punch

Read more...

A Simple {Friendship} Card...

Tuesday, July 19, 2011

Hello!  Today I thought I'd try a new technique that I hadn't heard of before watching the Make-It-Monday video yesterday on Papertrey Ink.  It's a technique called dry brushing.  The video shows paint but as says you can use ink, which is what I used.  I simply inked up my brush and lightly painted the white ink on the card starting from the edge dragging the brush to the center of the card.  I stamped the white chevron stripes before I did the dry brushing.

To make the flower, I used a scalloped circle punch and used scissors to cut a spiral to the center of the circle and then rolled it from the outside to the inside.  It's adhered with glue dots and then I added the black brad to sort of ground it.
You can see the edge of the card where I did the dry brushing technique.  I think it gives the card a sort of shabby chic feel.  What do yo think?

Have a great day!

{There's no one like you}
Stamps: Friends 'til the End, Chevron Stripes (Papertrey Ink)
Card Stock: Pain the Town Pink (CSS)
Ink: Fresh Snow (PTI)
Accessories: Scallop Circle Punch (SU), Black Brads (Making Memories), Paint Brush, Glue Dots

Read more...

A {Celebrate Your Day} Card...

Tuesday, June 28, 2011

Hi all! I thought I would make a card for PTI's Make It Monday Challenge.  I think this'll be one of my new weekly challenges.   This week the challenge was to make a card using a two-step masking technique.  First you mask the center rectangle to create the outside frame, then you mask the outside frame to stamp in the center.  Nichole shows some shortcuts in her video that I wouldn't have thought to do.  It's always worthwhile to watch the video even if you are familiar with the technique.  I learn something new every week.

Like the card I made last week, I used a background text stamp to make the frame.  I masked off the frame and stamped the flower, then masked the flower to stamp the leaves.  There's a lot of masking going on!!!
The flower and leaves were colored with ink and an aqua-painter.  I did it quickly and it does look like watercolor.  I applied a red rhinestone to the center of the flower and then outlined it with some smaller clear rhinestones.  


I'm starting to love these one layer cards.  It's really getting me out of my comfort zone in a good way.  


Have a great day!

{Celebrate Your Day}
Stamps: Signature Greetings, Text Style, Friends 'Til the End (Papertrey Ink)
Card Stock: SS White (PTI)
Ink: Green With Envy, Dare to Be a Diva Red, Brown Leather Satchel, Dish All the Dirt Brown (CSS)
Accessories: Red Rhinestone (Kaiser Craft), Clear Rhinestones (Michaels), Aqua-Painter, Stamping Sponge

Read more...

A {So Sweet of You} Card...

Thursday, June 23, 2011

Hello!  Well, I wasn't planning on making another card for PTI's Make-It-Monday Challenge, but I just couldn't get the idea of this card out of my head.  Like the card I posted on Monday, this card uses reverse masking.  I used the largest Labels 9 Spellbinder die to create a template (or stencil) with printer paper.  Once the I had the template in place, I stamped the text background in red and then sponged red around edges, lighter toward the center.
I picked up some new rhinestones at Micheal's the other day.  These are iridescent, which is a little hard to see in the photo. I love that they'll go with any card.  So fun!

Have a great day!

{So Sweet of You}
Stamps: Signature Greetings, Text Style (Papertrey Ink)
Card Stock: Kraft, Pure Poppy (PTI)
Ink: Dare to Be a Diva Red (CSS), Vintage Cream (PTI)
Accessories: Rhinestones (Michaels), Labels 9 Nesties (Spellbinders), Baker's Twine

Read more...

A {Thank You} Card...

Monday, June 20, 2011

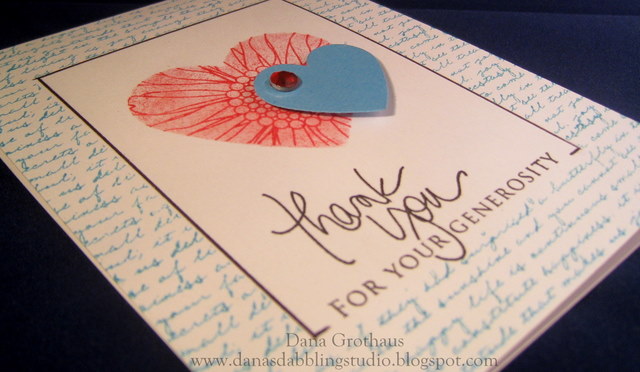
Hi!  We've had storms this morning and my kids totally subdued.  I've been taking advantage of that have been getting things done around the house.  So, this card is for this week's PTI Make-It-Monday Challenge.  I have found that even if I'm familiar with the technique, I still learn something new from watching the video.  In this one Erin showed how to make your edges of the reverse mask more defined by inking the edges.  


My card actually used two masking techniques.  First I cut out a rectangle of printer paper, placed it in the center and stamped text over it.  When I removed the mask I was left with a blank rectangle in the center of my card.  I used reverse masking for the red heart.  I punched a heart from some printer paper, used the reverse punch (paper with heart punched out of it) and stamped the flower image in the heart.  I then sponged some red ink lightly all over the heart.  Then I removed the printer paper.  
This card was so close to be one layer!  I couldn't help it to add that blue heart.  I decided to add a frame to clearly define the rectangle.  I used a plain old black ballpoint pen and ruler.  


Have a great day!

{Thank You}
Stamps: Friends 'Til The End, Text Style, Signature Greetings (Papertrey Ink)
Card Stock: SS White (PTI), Simply Blue-tiful (CSS)
Ink: Simply Blue-tiful, Perfect Little Black Dress, Dare to Be a Diva Red (CSS)
Accessories: Heart Punches (Paper Shapers), Ruler, Black Pen, Foam Dimensionals, Red Rhinestone (Kaiser Craft)

Read more...

A Butterfly {Birthday Wishes} Card...

Friday, June 17, 2011

Hello & TGIF!  I am totally pumped because I just bought tickets for Papertrey Ink's Stamp-A-Faire!  Is anyone else going?  It's in Cincinnati which is about 20 minutes away for me.  I'm so thankful I was able to buy them as soon as they went on sale since they sold out in about a half an hour.  So far it's me, my crafty sister-in-law Carrie and our equally crafty friend Katie.  


I thought I would take another stab at Papertrey's Make It Monday challenge to use the rock-n-roll technique.  Here's the card I made a few days ago.   This time I used the rock-n-roll technique on the spotted butterfly.   The center is pink and the edges are purple.  You can click on the photo see view it larger.  
I also tried a technique Lisa Johnson showed in the video for trimming around the butterflies.  That is pretty neat and I will definitely be trying that again.  


This stamp set, Butterfly Kisses was my very first PTI purchase.  It felt nice to use it again.  

Have a great day!

{Birthday Wishes}
Stamps: Butterfly Kisses (Papertrey Ink)
Card Stock: Simply Blue-tiful, Kraft Like a Rockstar, A Blanc Check (CSS)
Ink: Paint the Town Pink, VIP Purple, Dish All the Dirt Brown (CSS)
Accessories: Edge Distresser, Foam Dimensionals, Spiral Notebook Die (PTI), Baker's Twine, Lavender Rhinestones (Kaiser Craft)

Read more...

A {Whale of a Happy Birthday} Card...

Monday, June 13, 2011

Hello and happy Monday!!!  I hope you are having a great day.  So far so good here.  I was so excited to play with some new stamping goodies this morning.  I ordered two new stamp sets from Papertrey Ink.  The sets are Whale Wishes and Chevron Stripes.  I'm loving them both.  To tell you the truth I had not thought to use these two sets together, but it just made sense when I sat down in my studio.  The chevron stripes give the  feeling of waves which is a perfect background for the whale stamp.

This week's Make it Monday challenge from Papertrey Ink is to use the rock-n-roll technique where you roll darker ink along the perimeter of your stamp.  I did mine a little differently than the video on the PTI blog.  I tried it their way first but my ink dried to quickly.  So, I stamped the whale first using Simply Blue-tiful ink and then I cleaned off the stamp and then stamped the whale once again (on top of the first one) with the whale inked with Your Style Blue Me Away ink around the perimeter.  I really like the effect.


I have to say that I'm loving the chevron stripes.  They are so forgiving.  If your stamp is off a bit, you won't be able to tell in the long run.  These are so much fun.  

Have a great day!

{Whale of a Happy Birthday}
Stamps: Whale Wishes, Chevron Stripes (Papertrey Ink)
Card Stock: On the Catwalk Cream, Kraft Like a Rockstar, Your Style Blue Me Away (CSS)
Ink: Vintage Cream (PTI), Simply Blue-tiful, Your Style Blue Me Away (CSS)
Accessories: Whale Wishes Die (PTI), Foam Dimensionals, Oval Nestabilities (Spellbinders), Stamping Sponge

Read more...

A {Celebrate Your Day} Card...

Wednesday, April 6, 2011

Hey guys!  Now, I know what you are thinking, "Wow, Dana is a real genius with a sewing machine!".  Before you leave your comments of praise, I thought I would "keep it real" as they say.  I have never sewn this much on a card before.  In fact, I'm actually really impressed with all my straight lines.

I started by stamping my kraft base with the grid from the Guidelines set.  This made sewing in a straight line so much easier (except for that one line that really went crooked, but I hid it behind the sentiment panel, yeah, genius is right).  Now, here's the part where I "keep it real".
Yeah, what a mess!  And here's how it looked after I trimmed the thread and taped down the loose ends with scotch tape.
It looks so much better, but who wants to see a card with that on the inside?  So, I took a piece of lightweight card stock and lined the inside.
Now no one will know what a mess it was!

Okay, now that the inside is finished (I'm not big on decorating the inside of cards, outside is where it's at, just sayin'), it's time to work on the outside.
I decided to stamp inside the diamond grid with versamark using one of the images from the Guidelines set.  I decided to do this after the stitching because I would be really upset with myself if I did all that work and then ruined it when my sewing machine messed up (user error) and I would have to start over.  Luckily the sewing machine worked pretty good today.

And here is a close up of the sentiment.  Papertrey Ink's Make It Monday Challenge was to use heat embossing on your card.  Gold is one of my favorites.  I just love watching the matte powder turn to a shiny metallic.

The centers of the butterflies are white acrylic accents.

I hope you enjoyed today's card and the quirky mood I'm in.  

{Celebrate Your Day}
Stamps: Guidelines, Signature Greetings (Papertrey Ink)
Card Stock: Kraft, Dark Chocolate (Papertrey Ink)
Ink: Versamark
Accessories: Sewing Machine & Thread, Gold Embossing Powder (SU), Edge Distresser, Foam Dimensionals, Butterflies Punch (Martha Stewart), White Acrylic Accents (Ranger)

Read more...

A {Hope Your Day is Fabulous} Card...

Tuesday, February 15, 2011

Hey guys!  I was itching to get crafty this morning, but I did run on the treadmill first.  That's been my every-other-day routine for the past 6 weeks.  The other day I ran for 20 minutes straight!  That is something I never thought I'd be able to do and it feels great.
One of the reasons I was so eager to get in my studio this morning was because Papertrey Ink has started a new "Make it Monday" challenge.  This week's challenge was to include a vellum sentiment strip on your card.  I wanted to do something unique with the vellum so I decided to cut it so that the corners would fall in the middle of a flower and then put a rhinestone on that flower.  Kinda cool?
The layout for this card is this week's CPS Sketch.  This week's sketch was a little more complicated than their basic sketches that I'm used to.  I was still able to keep a CAS look though.

Thank you for clicking over to my little corner of the blog-o-sphere today.  You have no idea how much joy you bring to my day.  Have a wonderful day!!!

{Hope Your Day is Fabulous}
Stamps: Signature Greetings (Papertrey Ink)
Card Stock: Spring Moss, Ocean Tides (Papertrey Ink)
Patterned Paper: Early Bird (Cosmo Cricket)
Ink: Not Quite Navy (SU)
Accessories: Clear Rhinestones (Michaels), Vellum, Corner Rounder Punch, Foam Dimensionals

Read more...

Emboss Resist Challenge...

Friday, February 5, 2010

Hello! Hello! I was so excited to read this morning that Papertrey Ink is going to start hosting a weekly technique challenge (Make it Monday). I guess they decided to do a practice round today with an emboss resist challenge. You can see a video of this technique on Nichole Heady's blog. This is a relatively new technique for me, so it was nice to have a video to watch.
I wanted to keep the focus on the butterfly, so I kept the rest of the card clean and simple.


I hope you have a great weekend!

{Soaring by to say hi}

Stamps: Butterfly Kisses, Everyday Button Bits, Text Style (Papertrey Ink)
Card Stock: Raspberry Fizz, SS White (Papertrey Ink)
Ink: Pixie Pink (SU)
Accessories: Clear Embossing Powder (SU), Corner Rounder Punch (EK Success), Pink Ribbon (Offray), Foam Dimensionals, Clear Rhinestones (Michaels)

Bookmark and Share

Read more...
Related Posts with Thumbnails

  © Free Blogger Templates Columnus by Ourblogtemplates.com 2008

Back to TOP