A {Birthday Wishes} Card...

Thursday, January 31, 2013

Hello!  I have a fun card to share that I made using the new Doily stamp from CSS.  I paired it with Rounded Squares Trio to create all those window panels.

This card looks all CAS but honestly, if you flip the window panel over it looks like a mess!  It is six hand cut squares that are trimmed and scotch taped in place.  Whatever works, and you'll never see it.
 The whole cream panel is popped up on foam dots.
I love when you stop by for a visit!  Hope your day is wonderful!

{Birthday Wishes}
Stamps: Doily, Trinket Sentiments (Clear & Simple Stamps)
Card Stock: Kraft Like a Rockstar, Cre'me de la Cream (CSS)
Ink: Perfect Little Black Dress, Orange You Fabulous, Purplicious, Glamazon Green (CSS)
Dies: Rounded Square Trio (CSS)  
Accessories: Foam Dots

Read more...

An {I'm here for you} card set...

Wednesday, January 30, 2013

Hey there!  I've had this new stamp set from A-Muse for a while now and sadly just now inked it up for the first time.  It was a limited time only set that supported Breast Cancer Awareness.  

My card is so simple that I decided to make a set of four.
So easy, right?

Thanks for stopping by!

{I'm here for you...}
Stamps: Fight Like a Girl (A Muse)
Card Stock: I'm a Princess Pink, Cre'me de la Cream (CSS)
Ink: Perfect Little Black Dress, Paint the Town Pink (CSS)

Read more...

An {I Love You} Card...

Tuesday, January 29, 2013

Yep, more lovey-dovey Valnetine's Day stuff.  I think you guys will be happy when I stop using red on every single card I make.  Lol, too much of a good thing?

Anyway, I made another Valnetine's card, but this one can double as a simple "I love you" card.  Lot's of fun stuff going on here.  I die cut the heart in kraft card stock first, then embossed it with the woodgrain impression plate.  

I took a piece of cream card stock, stamped the sunburst image using red ink, then placed it under the heart, once in place I stamped the black heart outline.  
Check out the black faux stitching!  I haven't done that in for-evah!

TIP: The sentiment stamp "I Love You" is all one piece, however I didn't want to cut my stamp apart if I didn't absolutely need too.  So I stamped the full sentiment in cream ink on the black card stock strip, then cut apart the strip in the center of the word "love" and stacked the two strips on top of each other so that only one or two letters of the word "love" were showing, just enough that the heart would cover them and the spacing looked right.

Have a great day!

{I Love You}
Stamps: Sunburst, Love Cupid, Shapes: Hearts Combo (Clear & Simple Stamps)
Card Stock: Perfect Little Black Dress, Kraft Like a Rockstar, Cre'me de la Cream (CSS)
Ink: Perfect Little Black Dress, Dare to Be a Diva Red (CSS) Vintage Cream (PTI)
Dies: Imprints 4, Shapes: Hearts (CSS)
Accessories: Foam Dots, Stamping Sponge, Mini Circle Punch, Black Fine Tip Pen

Read more...

CSS Release Week 4...

Saturday, January 26, 2013

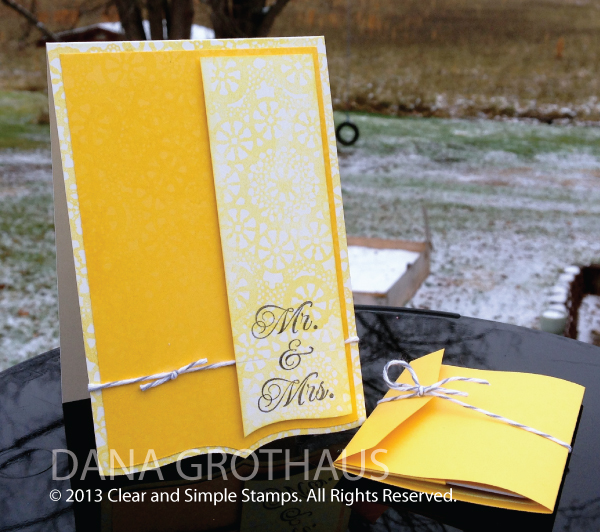
I'm so excited to share the very last products that Clear & Simple Stamps is releasing this month.  Have you spotted what's new in the ensemble above?  Today I'm focusing on a new edger die, Edgers 4 Combo that you can see on the bottom half of the card (this is a combo set that includes stamps and dies).  The entire card is stamped with a new Doily stamp that is about 4.5" in diameter, it is beautiful!  And that cute little package next to the card is a new Mini Tri-Fold 2 die that is like a card and envelope all in one!  Here I used it as a gift card holder.  

 Let's take a closer look at the card.
I stamped the cream card base and the "Mr. & Mrs." panel with the Doily stamp and Say Yellow to All Your Fans ink.  I used Edgers 4 to make the curve along the bottom of each panel.  The yellow panel is also stamped with the Doily image using From an Anonymous Source watermark ink.
Here's a closer look so you can see the stamping on the yellow panel.  The "Mr. & Mrs." panel is popped up on foam dots and over top of the twine.  I used Perfect Little Black Dress ink to stamp the sentiments, but I stamped it lightly on scrap paper first to remove some of the ink before stamping my final image.  Now the sentiment is more grayish than black.  I just love yellow and gray!

I know you are dying to see the inside of this package!  I wanted it to be easy to open so I tied it closed with the same twine from the card that you can just slide off.
This Mini Tri-Fold 2 Die is two parts, it's the folding envelope and the rectangular panel you see adhered in the center, which is also stamped with the Doily image.
This card/envelope perfectly holds a gift card.  I can tell I will be using this A LOT!  

Please check what the creations the design team came up with, using even more newly released products.  You won't want to miss it!


To see all the items released this month in one place, click here!

Hope your weekend is amazing!

{Mr. & Mrs.}
Stamps: Doily, All Occasions 1 (Clear & Simple Stamps)
Card Stock: Say Yellow to All Your Fans, Cre'me de la Cream (CSS)
InkSay Yellow to All Your Fans, Perfect Little Black Dress, From an Anonymous Source (CSS)
Dies: Edgers 4, Mini Tri-Fold 2 (CSS) 
Accessories: Gray/White Twine (CSS), Foam Dots, Stamping Sponge

Read more...

A {Congratulations} Card...

Wednesday, January 23, 2013

Hi there!  Just a quick post today.  This card is a CASE of this beautiful card I saw yesterday on Dawn McVey's blog.  I loved her card and had to see how I could make it using my stamps.

I'm pretty happy with how it turned out, although it still pails in comparison to Dawn's card, which is utter perfection.
I really do like the touch of black, it really grounds the card.

Thanks for stopping by for a visit, have a wonderful day!

{Congratulations}
Stamps: All Occasions 1, Love Cupid (Clear & Simple Stamps)
Card Stock: Cre'me de la Cream (CSS)
InkPerfect Little Black Dress, Purplicious, VIP Purple, Coral Necklace, Paint the Town Pink (CSS)
Accessories: Purple/White Twine (CSS)

Read more...

CSS Group Project: Favors

Tuesday, January 22, 2013

I have such a fun project to share!  Today's group project from Clear & Simple Stamps is to make party favors.  I decided to make these party favors for my daughter and her friend so they can have an American Girl Valentine's Day Party.  Each favor is filled with mini valentine's they can trade between their dolls and stuffed animals.    

I started my pulling out my Cuttlebug, Cube die and new Tiny Note + Envie dies.  I die cut the cube using red card stock (2), the envie using white printer paper (5) and the note using red card stock (5).  I cut two extra notes using white card stock for the fronts of each cube.
Each cube contains 5 valentines.
I had so much fun dressing up my daughter's doll.  She noticed right away that her doll had mysteriously changed clothes while she was at school :)
You won't want to miss the fun party favors some of the other DT members created:


Have a great day!

{Doll Party Favors}
Stamps: Taglines, All Occasions 2, Love Cupid (Clear & Simple Stamps)
Card Stock: A Blanc Check, Dare to Be a Diva Red (CSS)
Ink: Perfect Little Black Dress, Dare to Be a Diva Red (CSS)
Dies: Tiny Note + Envie, Cube (CSS)
Accessories: Red/White Twine, Sticky Tape, Stamping Sponge, Mini Hole Punch, Printer Paper

Read more...

CSS Release Day! Week 3...

Saturday, January 19, 2013


Hello!  I hope you are having a great weekend so far!  Clear & Simple Stamps is releasing some super fun items this weekend, including stamps and dies.  One of the newest stamp sets is called Air Mail and is so versatile.  You'll see!  I used it to create the above ensemble.  Let's take a closer look.  

I started with a kraft card base and stamped those "short diagonal lines" around the perimeter of the card and then the "Air Mail/Fragile" wording along the upper right and lower left hand sides.  Check out that cute envie!  It's a new die called Tiny Note + Envie.  I used vellum so you would be able to see the heart through the envie.  
I adhered the envie to the card with foam dots and then stamped the sentiments in black.
The heart is removable, making this card interactive.

For the favor, I used the same stamps as I used on the perimeter of my card.  The favor was made using the Party Favor 1 die and kraft card stock.   I made a tag by punching a small hole in the "tiny note" from Tiny Note + Envie dies.  I used the "to and from" stamp from Trendy Tags 2 and the heart is from Love Cupid.


I cannot wait to see what the other ladies created!  They are always such an inspiration!!!


Have a great day!


{Sending You My Love + Favor}
Stamps: Air Mail, Love Cupid, Trendy Tags 2 (Clear & Simple Stamps)
Card Stock: Kraft Like a Rockstar, Dare to Be a Diva Red (CSS)
Ink: Perfect Little Black DressDare to Be a Diva Red (CSS)
Dies: Tiny Note + Envie, Party Favor 1, Shapes: Hearts (CSS)
Accessories: Red/White Twine (CSS), Foam Dots, Vellum


Read more...

Another {Valentine's Day} Card...

Wednesday, January 16, 2013

Hi!  Yep, another Valentine's Day card.  I'm running so low on red card stock that I'm starting to get nervous!  I only have scraps left.  I need to reorder, stat!  

I started working on this card Sunday, I had the perimeter of the card done and then it just sat for a couple days, not knowing where to go.  I finally decided on a Valentine's theme.  The scroll and sentiments come from Love Cupid, which has been seeing a lot of action lately.  And the little randomly stamped heart is from Taglines: Critters, but any little heart will do.  
Designer Lines is definitely one of my favorite  background building stamp sets.  Its so versatile and the images are so bold and graphic, my favorite.

Have a great day!

{Happy Valentine's Day, Sweetheart}
Stamps: Love Cupid, Designer Lines, Taglines: Critters (Clear & Simple Stamps)
Card Stock: Cre'me de la Cream, Dare to Be a Diva Red (CSS)
Ink: Perfect Little Black Dress, Dare to Be a Diva Red (CSS)
Accessories: Foam Dots

Read more...

CSS Group Project-- Vday Tags

Tuesday, January 15, 2013


Hey friends!!!  I have such a fun project to share with you today.  The Clear & Simple Stamps Design Team and I are sharing our Valentine's Day tag creating.  I have to say, this was so much fun!  I ended up making 5 tags to put on some treat bags for Valentine's Day.

I started by getting out my Tags 1 dies.  I cut 5 large tags out from A Blanc Check card stock, and 5 small tags from Dare to Be a Diva Red card stock.  I stamped the tag outline from Trendy Tags in black.  Next, I put together the letter to spell "bee mine" from Alpha Clear.  "Bee" is stamped in black and filled in with a red sharpie marker, "Mine" was stamped using red ink and left as an outline.
The whimsical swirls come from Taglines: Critters, and so does the bee.  I stamped the bee image on the red tag first and then stamped on a piece of white card stock.  I colored the bee with a yellow copic marker (Y35). When I cut out the bee, I didn't cut out the antenna, and then glued it in place on the tag, over top of the stamped image, that way it uses the antenna from the first image.   I took the tiny heart from Taglines: Critters and stamped it in red right over top of the dot in the "i" in "mine".

I stacked the two tags and tied them to the bag of treats using red, shiny curling ribbon.

You won't want to miss the wide variety of tags the Design Team has created:


Have a great day!

{Bee Mine Tags}
Stamps: Alpha Clear, Taglines: Critters, Trendy Tags (Clear & Simple Stamps)
Card Stock: A Blanc Check, Dare to Be a Diva Red (CSS)
Ink: Perfect Little Black Dress, Dare to Be a Diva Red (CSS)
Dies: Tags 1 (CSS) 
Accessories: Curling Ribbon, Red Sharpie
Copics: Y35 
 

Read more...

Sneak Peek!

Sunday, January 13, 2013


Hi there!  Just popped on for a minute to let you know I have a project featured on the Clear & Simple Stamps App for the iPhone/iPod.  I have to tell you, this is a card I absolutely love!


Have a great rest of your weekend!!!

Read more...

A {Be Mine} Valentine Card...

Wednesday, January 9, 2013

Hello!  It's been hard, but I am determined to post five times a week.  Hopefully once I get going, I won't be able to stop.  So, this morning I was checking out my Google Reader and stumbled upon the Silhouette free shape of the week (one of the many things I love about Silhouette), and the shape was actually a full card with all the embellishments.  I really liked the card base, so I decided to use that for my card today.  Everything you see in pink was cut with my Silhouette, the hearts at the bottom were the centers of the hearts at the top.

I really liked the diagonal lines at the bottom of the card the was made on the Silhouette Blog, so I recreated that using lines from Designer Lines from CSS.  I simply placed post-it notes over the top of the card when I stamped the lines in black.
The sentiment comes from Love Cupid.  The hearts and sentiment panel are all popped up on foam dots.

I love Valentine's Day!  I'm sure you'll be seeing more Valentine's Day stuff from me leading up until the big day.

Have a great day!

{Be Mine Valentine}
Stamps: Love Cupid, Designer Lines (Clear & Simple Stamps)
Card Stock: I'm a Princess Pink, Cre'me de la Cream (CSS)
Ink: Perfect Little Black Dress (CSS)
Accessories: Digitally Cut Image (Silhouette), Gems, Foam Dots

Read more...

Group Project: Nature of Winter

Tuesday, January 8, 2013


Hey there!  I have a fun winter project to share with you today.  It's our first Clear & Simple Stamps group project of the year.  The first challenge was to make a card/project with the theme of Nature in Winter.  

I put together a wintery card using a twig from my yard, some liquid appliqué for the snowflakes and woodgrain stamp for the "tree".  

I colored the my little owl guy with copics, using a darker color to outline the scallops and ears.  I used an orange sharpie for the owl feet.

I stamped the letters for "wishes" using Alpha Clear and colored them in with a light blue copic marker, the same color as the owl's eyes.

I used a snowflake stamp from Taglines and liquid appliqué for the snowflakes, although you can't see the stamp.  I used it as a guide for the liquid appliqué.  If you've never used liquid appliqué, it goes on like puffy paint and then it puffs up when you heat it up with your heat gun.
I used Tombow Multi Glue to adhere the twig and it is staying on really well, much better than the glue dots I tried at first.  The glue dries completely clear.  

Check out the other group projects that are happening today with a Nature of Winter theme:


Have a great day!

{Winter Wishes}
Stamps: Alpha Clear, Icons Sentiments, Taglines, Taglines: Critters, Background Basics 1 (Clear & Simple Stamps)
Card Stock: Kraft Like a Rockstar, Cre'me de la Cream (CSS)
Ink: Espresso Your Style (CSS)
Accessories: Liquid Applique, Foam Dots, Twig, Orange Sharpie Marker
Copics: B93, W1, W3, W5 

Read more...

A {Mr. & Mrs.} Card...

Monday, January 7, 2013


Hello!  I had a clear vision for this card, just a one layer card with six squares popped up on dots.  Well, I had my 2 x 3 rectangle cut and stamped, then I accidentally made my first cut at a half inch instead of an inch!  Whoops!  I could have redone it, but I wanted to see how it played out.  I didn't intend to mat the rectangles (would be squares) on the gray card stock, but it was just easier to maneuver.  I laid them all out first, then adhered them with foam dots, then trimmed the gray card stock.
The design reminded me of stained glass that you might find in a church, so I thought this would be a perfect wedding card.  

I also have another card to show you, it's on the Clear & Simple Stamps App for the iPad/iPhone.  Here's a sneak peek...
Have a great day!  

{Mr. & Mrs.}
Stamps: All Occasions 1, Background Basics 1 (Clear & Simple Stamps)
Card Stock: Dare to Be a Diva, Cre'me de la Cream, Such a Gray-cious Host (CSS)
Ink: Perfect Little Black Dress (CSS)
Accessories: Foam Dots

Read more...

CSS Release Day W1...

Saturday, January 5, 2013


Hello!  I'm so happy to be here, sharing the newest products being released by Clear & Simple Stamps. First, I'm sharing a really fun and versatile alphabet set, Alpha Clear.  I love that the letters are an outline and you can color them any color you like.  I didn't do that here because I love them as-is.  
You can also spot another new product on my card, did you see it?!  It's a new embossing plate with a houndstooth design, which is one of my favorite patterns!  It's called Imprints 5 and has an elegant design on the flip side of sheet music and pinecones.  
Lot's of fun laters on this card, which makes it perfect for my little guy's birthday.  It uses his favorite colors and it's personalized, I think he'll love it.  
Can't forget about the gift!  I made a coordinating gift tag using the same Alpha Clear set as the card and also using Imprints 5 for the houndstooth design.  

Next up is an addition to the Uppercase and Lowercase die cut alphabet sets, Symbols.  I have so many cards using emoticons pinned on Pinterest.  I'm so glad I was finally able to make a set.  
These cards were so simple.  I used Imprints 5 on all the card bases and Lowercase Alpha for all the words.  Here's the how the emoticons were created:

Laugh: Colon, Uppercase letter D 
Wink: Semi Colon, Dash, End Parenthesis
Smile: Equal Sign, End Parenthesis

My only dilemma was figuring out if I should leave the emoticons sideways like they would appear on a screen, like :) .  In the end I decided I wanted the emoticons to be obvious.
There are even more products being released today, you won't want to miss them!  Check them out at these following blogs:


Have a great day!

{Happy 8th Birthday Colin}
Stamps: Alpha Clear, Number Blocks 
Card Stock: Cre'me de la Cream, Dare to Be a Diva Red, Orange You Fabulous 
Ink: Dare to Be a Diva Red, Orange You Fabulous, Cream
Dies:  Rounded Squares, Imprints 5, Tags 2
Accessories: Red/White Twine, Small and Large Circle Punch, Foam Dots, Corner Rounder Punch, White Gel Pen

{Emoticon Card Set}
Card Stock: Kraft Like a Rockstar, Paint the Town Pink, Glamazon Green, Orange You Fabulous, True Blue Fan
Dies: Imprints 5, Lowercase Alpha, Uppercase Alpha, Symbols 
Accessories: Foam Dots

Read more...
Related Posts with Thumbnails

  © Free Blogger Templates Columnus by Ourblogtemplates.com 2008

Back to TOP