
CSS Customer Appreciation Month!!!
Tuesday, December 4, 2012
Here is the stamp set:

If you've been hanging out around these parts for a while, you know that I make Christmas cards every year. I usually make about 75 and work on them over the course of a couple months. Not so this year! I made my cards in three days!!! It really helped that the kids were in school all day and I had big chunks of time to dedicate to the task.
Here's my process:

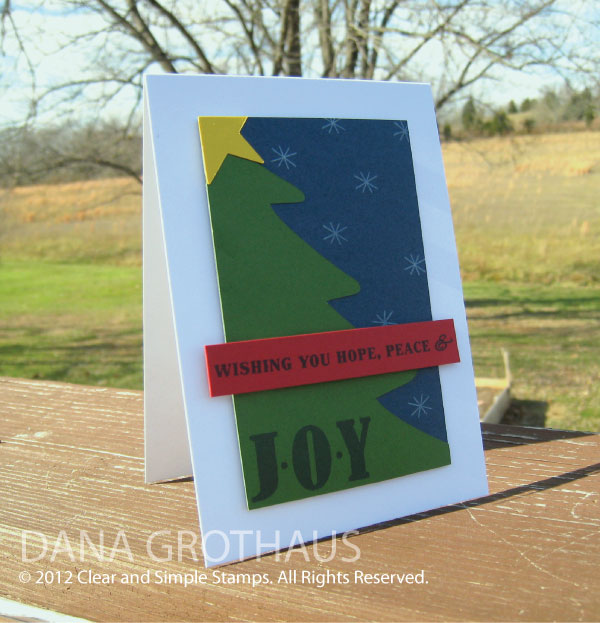
- First things first. You need a prototype. Once I figured out what my card was going to look like (above), I could start cutting all the components.
- I cut these trees out on my Silhouette. They perform double duty. Since you only see the right side of the tree, I cut the tree down the center and then took the left side and flipped it over. That way I only needed to cut out half the amount of trees and it was less wasteful that way too.

- I cut the stars out on the Silhouette as well.

- Here's all the paper items I needed to assemble the center panel.
- I started off by using adhesive to apply the tree, then I trimmed the edges off the top and bottom of the tree.

- Then I adhered the star using liquid glue.

- Here they are all spread out.

- While I was waiting for the glue to dry on the stars, I stamped the sentiment "Wishing You Hope, Peace &" on the red strip.

- It's very important to do this in front of the TV to stave off boredom. I did all my holiday card making on the coffee table in my living room, not in my studio.

- Once the stars were dry, I trimmed off the excess.

- I must have forgotten to photograph the next part, but I stamped the word "JOY" on each tree base.
- Then I stamped the snow. I used white ink and little snowflake stamp from the stamp set "Taglines".

- All that was left now is to apply the red sentiment strip with foam dots and then adhere the entire panel to a white card base using more foam dots.
- I cut and scored all of the card bases a few weeks ago at a girls craft night. At that point I had no idea what my card would look like, but white card stock for the base was a pretty safe choice.

- Here's what they look like all spread out on my coffee table, all 74 of them! (I'm missing one because my first prototype was a disaster).

I can't wait for you to see what the other designers have created with the new, limited edition JOY stamp set! You won't want to miss it.
- Laurie Willison
- Lori Tecler
- Elena Roussakis
- Jaclyn Miller
- Kim Duran
- Jennifer Rzasa
- Tracy Schultz
- Laura Bassen
- Clear & Simple Stamps
Have a great day!

{Wishing You Hope, Peace & Joy}
Stamps: Limited Edition JOY, Taglines (Clear & Simple Stamps)
Card Stock: A Blanc Check, Glamazon Green, True Blue Fan, Say Yellow to All Your Fans, Dare to Be a Diva Red (CSS)
Ink: True Blue Fan (CSS), White
Accessories: Foam Dots, Silhouette Shapes (Tree & Star), Silhouette Machine


3 comments:
I LOVE this blog post! First of all, your card design is adorable. Second of all, what card-maker doesn't find a shot of 74 cards laid out completely thrilling? love it.
Oh my gosh, that is insane! I LOVE the photos of your process. And it gives me hope that I just might finish my own holiday cards this year!
Oh my gosh- 75 cards in three days- you are amazing!!!! These are super cute, too.
Post a Comment