Showing posts with label altered item. Show all posts

Clear & Simple Stamps: Group Project

Tuesday, August 9, 2011

Hello!  Today is our group project day at Clear & Simple Stamps!!!  This time we are using the new SOTM: House Notes II on things around the house (for instance coasters, message board, mini notepad for phone messages, magnets, guest towels, etc).  
We received some coasters as a wedding favor, and it was really sweet.  But, I took them apart and put a new picture in it.  I used the chair image from House Notes II and paper pieced it with some fun patterned paper for the chair cushions.     
Here are all four of them.  Click on the photo to see it larger.  


I hope you'll stop by the Clear & Simple Stamps Blog to see all the design team creations.  You are sure to be inspired by those talented ladies!

Have a great day!

{Relax Coasters}
Stamps: House Notes II (Clear & Simple Stamps)
Card Stock: On the Catwalk Cream (CSS)
Patterned Paper: Gertie (My Mind's Eye)
Ink: Dish All the Dirt Brown, Simply Blue-tiful (CSS)
Accessories: Glass Coasters, Scissors, Floss
Copic Marker: W5 

Read more...

Clear & Simple Stamps: Group Project

Tuesday, April 12, 2011

Hey there!  It's a fun day around these parts.  It's Group Project day with Clear & Simple Stamps.  This month the design team and I were challenged to create a card or 3D item using fabric.  How fun!  This combines two of my favorite hobbies.

So, I used this month's SOTM, On the Mend II and some fabric to create two hair accessories any little girl would be happy to wear.   

Here's the set.  It's a head band and a barrette that is clipped to a gift tag.
The tag was created out of Kraft Like a Rockstar card stock with some patterned paper.  I created the faux stitching using a ruler and a black sharpie.  I punched two holes in the center of the tag and that's how the barrette is attached to the tag.
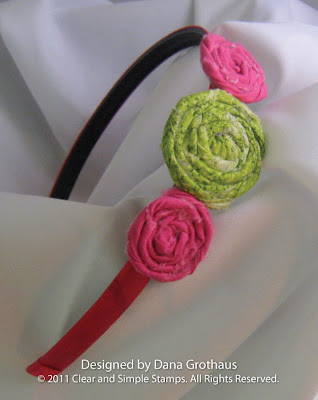
This was my daughter's headband.  It was already covered in pink ribbon.  I simply tore off the tacky flower that came on it and replaced it with these three fabric flowers that I made.
And here's my little girl modeling her new headband.  She absolutely loved it.
About the flowers.  They are super simple to make.  All you need is some thin strips of fabric and a glue gun.  I started by tying a knot in the end of a fabric strip and then gluing that knot to a little circle of card stock or felt (both work fine).  From there, all you do is twist the fabric and wrap it around the knot, gluing here and there to keep the fabric attached to the felt base.  When your flower is big enough, simply wrap the fabric around the back and glue it down.  Once your flower is finished, hot glue it to whatever your heart desires.  


Make sure you check out the rest of the design team and their fabric creations: Kim Howard, Viola Mahr, Lori Tecler, Ryann Salamon, Cristina Kowalczyk, Tiffany Johnson, and Tracy Schultz.  


Have a great day!

{Fabric Flower Hair Accessories}
Stamps: On the Mend II (Clear & Simple Stamps)
Card Stock: Kraft Like a Rockstar (CSS)
Patterned Paper: Gertie (My Mind's Eye)
Ink: Perfect Little Black Dress, Brown Leather Satchel (CSS)
Accessories: Corner Rounder Punch, Black Fine Tip Marker (Sharpie), Ruler, Stamping Sponge, Fabric, Hot Glue Gun, Barrette, Head Band, Hemp Twine

Read more...

Teacher Gifts, Crayon Initials

Wednesday, December 22, 2010


Hello!  I can finally share the gifts I made for my kids to give to their teachers.  I stumbled upon the Frugal Life Project over the summer and immediately bookmarked this post for future reference.  

I had some old framed pictures from when I was going through a French Country phase (yes, can you believe that?).  These frames were white and had a floral tea cup filled with flowers.  I spray painted the frames black and left the mat alone.  The only thing I had to buy for this project were two boxes of crayons (but you can use old ones too).  

I pretty much followed Carol's instructions except I used a low temp hot glue gun to adhere the crayons.  The wax didn't melt at all.  
I really like how this turned out, but if I were to do it again I would make sure the "G" I printed behind the crayons was a fainter grey.  I was not about to waste another piece of my PTI card stock, LOL.  That is bothering me a bit, but not enough to start over.  

Luckily for me both of Halle & Colin's teachers last names begin with a G.  So, here's both of the frames.  
Hope you enjoyed today's project.  It was quick, easy and painless once I stopped worrying about it and actually did it.  My mind is my own worst enemy sometimes.  

My hubby is officially on vacation and he gets the pleasure of accompanying me to our kid's holiday parties.  I'm sure he's delighted!  Things have been getting done around here.  The latest excitement is a new dishwasher.  Finally, a dishwasher that washes dishes.  What a concept!

Have a great day everyone!


Bookmark and Share 

Read more...

Paper Maniac Thursday - Recycle It!

Thursday, July 15, 2010

Hi!  Thanks for joining me here for Paper Maniac Thursday.  The theme this week is using recycled items on your cards/projects.  I had a hard time coming up with something to put on a card.  I really thought about it and finally decided to use something that we all recycle--gift bags!  I don't think I've ever thrown away a gift bag.  I know I still have several from when I got married 8 years ago.  I re-use these all the time but have not ever altered one.  I went to my stash and selected this iridescent white bag.  I paired is with some paper from the Nook & Pantry collection from Basic Grey.  I cannot begin to tell you how easy this was.
When I was finished with the bag, I made a coordinating tag.  My daughter's birthday is coming up so I thought I would make it for her.  The sentiment stamp is an individual stamp from Hero Arts.  The cupcake is cut from a whole sheet of cupcakes also from the Nook & Pantry collection.

Have a wonderful day!

{Birthday Gift Bag & Tag}
Stamps: Have a Happy Birthday (Hero Arts)
Patterned Paper: Nook & Pantry (Basic Grey)
Ink: Chocolate Chip (SU)
Accessories: Corner Rounder Punch (EK Success), Taupe Ribbon, Circle Punch (Paper Shapers), Flower Border (Basic Grey), Gift Bag, Tissue Paper
Bookmark and Share

Read more...

Animal Crackers!

Tuesday, July 13, 2010

Hey guys!  My blogging has been a bit erratic lately.  I'm over the stomach bug I had, but it's taking a little time to get my energy and mojo back.  Plus, we have a big weekend coming up and then we are going on a mini vacation the end of next week.  There are a lot of things to plan and I've been busy.

I thought I would share a project with you today that I created using Clear & Simple Stamps.  A few weeks ago I received a sample of Crystal Lite in the mail that came in a cute cardboard cylinder.  As soon as I saw it, I knew I was going to fill it with something fun alter the outside.  The tube came in two parts, the top a bit larger than the bottom so that they slide together.
I used  Circus Fun to create the borders and then used Alpha Blocks II to spell out 'Animal Crackers'.  The solid images are stamped in red and then are accented in blue.  It was easier than I thought to space them evenly and straight.  I simply made a straight line with my ruler and then made a little mark in pencil every inch and a half.  I stamped right where I made the pencil mark.  The label was made using a scalloped rectangle nestablities die.  I used a circle punch for the balls.  I really like this color combination for a circus themed project.  It just screams FUN.
Thanks so much for stopping by today!

{Animal Crackers Container} 
Stamps: Circus Fun, Alpha Block II (Clear & Simple Stamps)
Card Stock: Say Yellow to All Your FansYour Style Blue Me AwayA Blanc Check 
Ink: Real Red, Brilliant Blue (SU), Fresh Snow (Papertrey Ink)
Accessories: Cardboard Tube, Glue Dots, Sticky Tape, Circle Punch (SU), Scalloped Rectangle Nestie (Spellbinders)
Bookmark and Share

Read more...

Altered Notebook & Teacher Cards

Friday, May 21, 2010

Hi there!  I'm so glad you stopped by today!!!  I have two projects to share with you today.  First up is an altered mini composition book that I made for my little girl to help her (and me) keep track of all the books she reads.  She's just finishing the first grade and reads a chapter book a day!  I'm the one who ends up going to the library to pick up and return books for her and I can never remember what she's read and what she hasn't.

Anyway, about the notebook.  I used three pieces of patterned paper from the Green at Heart collection by Basic Grey.  I colored the centers of the flowers with a black fine-tip sharpie to better coordinate with the black binding on the book.  I also used the sharpie for the faux stitching.  I used my computer and printer for "Halle's" and then punched it out with a curly label punch. Halle loves things like this.  She was so happy when I showed it to her.  We can't wait to fill it up!
Next, I have a set of cards I made to go along with gifts for Colin's preschool teachers.  As you can see these cards are super simple.  Every year the last day sneaks up on me so that's really why these cards are so simple.  These cards are 3" squares.  They use a little strip of fozz felt and one meaningful stamp.  I had Colin dictate what he wanted to say and then signed them himself.  Most of them went something like this: "Thank you for being a good teacher.  I hope you miss me next year when I am in kindergarten.  Have a good year without me.  Love, Colin."  Too cute!!!  He also picked out a few books from his bookshelf to donate to his preschool classroom.  He is such a thoughtful and kind little boy.

I hope you all have a fantastic weekend!


{Halle's Books Notebook}
Patterned Paper:  Green at Heart (Basic Grey) 
Accessories: Daiquiri Thickers (American Crafts), Raspberry Fizz Topnotch Twill (Papertrey Ink), Curly Label Punch (SU), Black Fine-Tip Marker (Sharpie), Computer & Printer, Mini Composition Book 

{Grateful for you}
Stamps: Signature Greetings (Papertrey Ink)
Card Stock: Kraft (Papertrey  Ink)
Ink: Close to Cocoa (SU) 
Accessories: Daisy Chain Fozz Felt (Kaiser Craft), Corner Rounder Punch (EK Success)

Bookmark and Share

Read more...

Paper Maniac Thursday - Alter It!

Thursday, May 13, 2010

Hi there!  It's Paper Maniac Thursday!!!  This week we've been showing you all kind of altered items on the Paper Maniac Blog.  Today it's my turn.  I took a little kraft box that I've had sitting in my studio for ages and dolled it up.  I added a little card to complete the look.
First I took a 6" x 6" piece of Earth Love by Basic Grey patterned paper and adhered it to the lid of the box.  Next, I took some Chocolate Chip grosgrain ribbon and adhered that around the box and the lid separately so you don't have to remove the ribbon to open the box.   I created the bow by looping the ribbon and sticking it in place with glue dots.  I threaded the button with some coordinating floss and stuck that in place with another glue dot.
For the card, I simply used the same patterned paper and ribbon technique.  The sentiment is from Hero Arts.  The card is 3.5" x 3.5" and the box is a 4" square and is 2.5" tall.

Thanks so much for stopping by today!

{Treasure Ensemble}
Stamps: Essential Messages (Hero Arts)
Card Stock: Kraft (Papertrey Ink), Cream
Patterned Paper: Earth Love (Cosmo Cricket)
Ink: Mellow Moss (SU) 
Accessories: Chocolate Chip Grosgrain Ribbon, Button, Floss (DMC), Coluzzle, Corner Rounder Punch (EK Success), kraft box
Bookmark and Share

Read more...
Related Posts with Thumbnails

  © Free Blogger Templates Columnus by Ourblogtemplates.com 2008

Back to TOP