Clear & Simple Stamps: App Sneak Peek...

Tuesday, August 16, 2011

Hey guys!  I took a little bit of a blogging break, but I hope to be back in full force soon.  My kiddos are going back to school tomorrow and I can finally start to have a daily routine again.  I have really neglected running (although I'm still doing great with my healthy eating- 8+ weeks eating plant based).  Anyway, I am a creature of habit and can't wait to get back in the swing of things, although I will miss my kids dearly, they are ready to go back.  


Anyway, I have a really cute card featured on the Clear & Simple Stamps App for the iPhone today.  So if you've come here looking for some inspiration, that's where it's at today :)
For more info about the app, click here.  Thanks so much for stopping by!  See you all soon!

Read more...

Clear & Simple Stamps: Group Project

Tuesday, August 9, 2011

Hello!  Today is our group project day at Clear & Simple Stamps!!!  This time we are using the new SOTM: House Notes II on things around the house (for instance coasters, message board, mini notepad for phone messages, magnets, guest towels, etc).  
We received some coasters as a wedding favor, and it was really sweet.  But, I took them apart and put a new picture in it.  I used the chair image from House Notes II and paper pieced it with some fun patterned paper for the chair cushions.     
Here are all four of them.  Click on the photo to see it larger.  


I hope you'll stop by the Clear & Simple Stamps Blog to see all the design team creations.  You are sure to be inspired by those talented ladies!

Have a great day!

{Relax Coasters}
Stamps: House Notes II (Clear & Simple Stamps)
Card Stock: On the Catwalk Cream (CSS)
Patterned Paper: Gertie (My Mind's Eye)
Ink: Dish All the Dirt Brown, Simply Blue-tiful (CSS)
Accessories: Glass Coasters, Scissors, Floss
Copic Marker: W5 

Read more...

A {Thinking of You} Card...

Friday, August 5, 2011

I think this is the first card I'm sharing using the new limited edition stamp set that I received at the PTI Stamp-A-Faire.  This set is full of iconic images like the silhouette I used on my card.  I also love that this set includes a few larger than normal sentiments.  


I masked the center of the card with a square post-it note, stamped the text, then outlined the pot-it note with pencil to create a frame.  I removed the post-it note and stamped the silhouette and sentiment.  The finishing touches are the rhinestones and the floss.

Have a wonderful weekend!

{Thinking of You}
Stamps: Iconic Images, Text Style (Papertrey Ink)
Card Stock: Vintage Cream (PTI)
Ink: Coral Necklace, Dish All the Dirt Brown, Brown Leather Satchel (CSS)
Accessories: Brown Floss, Rhinestones, Pencil

Read more...

A {Thank You} Card...

Thursday, August 4, 2011

This was such a simple card to make.  I discovered that these two dies (top note and labels 9) really fit together well.  I just had to use them on a card.

My wreath is stamped using two colors of green for the berries.  Green berries don't really make sense on a wreath, but papercrafting doesn't have to make sense, right?  I think the buttons really make this card, it gives it a finished look.


Well, that all for me today folks!  Today's going to be a catch-up day.  I'm way behind on quite a few things.  


Have a great day!

{Thank You}
Stamps: Wreath for all Seasons, Signature Greetings (Papertrey Ink)
Card Stock: A Clean Slate, A Blanc Check, Kraft Like a Rockstar (CSS)
Ink: Glamazon Green, A Clean Slate, Dish All the Dirt Brown (CSS)
Accessories: Top Note Die (SU), Labels 9 Die (Spellbinders). Buttons, Floss

Read more...

A {Have a Fabulous Day} Card...

Tuesday, August 2, 2011

Hello there!  The card I'm sharing today is one that I made at the PTI Stamp-a-Faire.  I started with a kraft card base and then cut a rectangle of berry sorbet card stock slightly smaller than the card base.  I used that panel to layer the scallops on.  I started from the bottom adhering the strips of scallops, overlapping them and shifting the scallops so they were offset.  When I was finished, I trimmed the edges.


The gems that go across the top are a new product that I bought at Michaels (they are the Recollections brand) called Bling on a Roll.  They come on a roll just like they are seen on my card.  They are hard to cut apart and are meant to be used in a line.  
When my card was finished I lifted up each scallop to add some dimension.  I used pti card stock and that paper is really thick.  You can see that I didn't get the cleanest cut on my scallops.

Have a great day!

{Hope Your Day is Fabulous}
Stamps: Signature Greetings (Papertrey Ink)
Card Stock: Kraft, Spring Rain, Ripe Avocado, Terracotta Tile, Orange Zest, Berry Sorbet (PTI)
Ink: Your Style Blue Me Away (CSS)
Accessories: Bling on a Roll (Michaels), Corner Rounder Punch, Scallop Edge Punch (SU)

Read more...

Clear & Simple Stamps: August 2011 Release

Monday, August 1, 2011

Can you believe it's August all ready?  School will be starting in  just a few weeks for my kiddos.  Since it's the first of the month, you know what that means, a brand new set from Clear & Simple Stamps!!!  This set is called House Notes II (it coordinates with House Notes) and is my current obsession.  I am addicted to paper piecing that couch.  
This is the first card I made with House Notes II.  I chose patterned paper for the couch that actually looks like a design you would find on a couch.  I think that's my favorite part.  Before I paper pieced the couch, I stamped the image on kraft and outlined it with a gray copic marker.  It's hard to see but it really makes the image pop off the page.  With the sentiment "your couch awaits," I think this would be a great retirement card.
For the text strip on the side, I took one of the sentiment stamps and stamped it repeatedly moving it around a bit.  
Make sure you check out the Clear & Simple Stamps Blog to see all the Design Team creations.  They never disappoint.

Thanks so much for dropping by!  Have a fantastic day!!!
{Your Couch Awaits}
Stamps: House Notes II (Clear & Simple Stamps)
Card Stock: Perfect Little Black Dress, Kraft Like A RockStar (CSS)
Patterned Paper: Hattie (My Mind's Eye)
Ink: Perfect Little Black Dress (CSS)
Accessories: Foam Dimensionals, Corner Rounder Punch, Stamping Sponge, 
Copic Markers: W3 (Warm Gray) 

Read more...

Clear & Simple Stamps: App Sneak Peek...

Saturday, July 30, 2011

Hey guys!  Just a quick note.  Today I have a card featured on the Clear & Simple Stamps APP for the iPhone. For details about the app, click here.  Here's a little peak at my card:
Have a great day!

Read more...

A {Get Glammed Up} Card...

Friday, July 29, 2011

 
Happy Friday!  I have fun little number to share with you today.  This card was created using the new stamp set of the month (Beauty Secrets II) by Clear & Simple Stamps.  I've really started to like coloring with my copic markers.  I don't have many trios yet, but I'm having a good time with the ones I do have.  

The kraft card base uses two Labels 9 (Spellbinders) die cuts, they are adhered together at the top.  I used the a smaller Labels 9 die for the patterned paper.  I stamped the cosmetics image on A Blanc Check card stock using A Perfect Little Black Dress ink.  I colored the image with copics making sure to outline the image as well.  I cut it out with scissors and adhered it to a pink oval die cut using foam dimensionals.   
I really like the sentiment placement.  There really wasn't anywhere else to put it, but I like that it's over the image but not really covering up anything important.  

Hope you all have a great weekend.  We have a busy one coming up.  The end of July and the beginning of August is filled with birthdays.  My daughter's was earlier this week and mine is tomorrow.  Throw in a brand new nephew and things are getting interesting.  It's going to be fun though.  Have a great day!   

{Get Glammed Up}
Stamps: Beauty Secrets II (Clear & Simple Stamps)
Card Stock: Kraft Like a Rockstar, A Blanc Check, Paint the Town Pink (CSS)
Patterned Paper: Gertie (My Mind's Eye)
Ink: Your Style Blue Me Away, Perfect Little Black Dress (CSS)
Accessories: Foam Dimensionals,  Oval & Labels 9 Nesties (Spellbinders), Pink Rhinestone, Brown Marker, Stamping Sponge
Copic Markers: B93, B95, B99, W3, 0 Colorless Blender, 100 Black

Read more...

A {Welcome Baby Grant} Card & Gift Set...

Thursday, July 28, 2011

Hello!  I'm so happy you stopped by today so I can tell you all about my nephew that was born this morning. My SIL was supposed to be induced this morning but the baby couldn't wait that long.  My SIL went into labor last night and had the baby at 4:49 this morning.  I didn't even know she went into labor last night and woke up to a text from my brother saying baby Grant had arrived!  Such a great way to start my day.

So of course we headed to the hospital as soon as we were given the go ahead.  I had Grant's gift all ready but I still needed to make a card.  I've known the baby's name for months so you would have thought I would have had a card made ahead of time, but I didn't.
I love to make cards, but I especially love to make cards when I'm making them for a specific person.  It gives me such a warm feeling while I'm making it and knowing who will see it and how they will feel knowing I made it especially for them.  In this case it was Grant's parents since Grant is, well, a baby.
I know glitter is probably considered girly, but in this case it just shows how excited I was.  I wanted to glitter everything.  Note: When you use glitter expect to have some on your face here and there until your next shower.  


Since Grant is my brother and SIL's second child, there were no showers or registries.  I wanted Grant to have something special so I learned how to crochet so I could make him a baby blanket. Thank goodness it takes 9 months to have a baby because it took me a long time to get crocheting down.  I started his blanket on May 21st and finished it on July 4th.  When I worked on it I would always think about Grant using the blanket and the life he has ahead of him.  Needless to say, I loved working on his blanket.
Now, I don't really know how to properly photograph a blanket so I just laid it on my bed (artfully?).  It is a little larger than a regular baby blanket.  It's pretty thick and soft, very flexible and not stiff at all.

This is something my family calls a love-y.  It's a little blanket (about 1' x 1.5') that babies sleep with.  They usually get attached to it have to sleep with it all the time.  I hope he likes Aunt Dana's love-y.  It is super soft like a stuffed animal.  The material was hard to work with, but I love how it turned out.
And here they are all wrapped up before I put them in the gift bag.  Presentation is everything!
I wouldn't be a good aunt if I didn't share a couple pictures of the little guy.  


Thanks so much for stopping by!  Hope you didn't mind my gushing too much.  See you tomorrow!!!

{Welcome Baby Grant}
Stamps: Fresh Alphabet, Whale Wishes (Papertrey Ink)
Card Stock: Kraft Like A Rockstar, Green With Envy, Glamazon Green, A Blanc Check (CSS)
Ink: Your Style Blue Me Away, Green With Envy (CSS)
Accessories: Sticky Tape, Glitter, Foam Dimensionals, Corner Rounder Punch, Edge Distresser

Read more...

Papertrey Ink: Stamp-A-Faire

Tuesday, July 26, 2011


Stamp-a-faire-2011-logo-web
Hi guys!  It's about time I posted about the Papertrey Ink Stamp-A-Faire, right?  I will warn you, this post is going to be long and pretty much all about me, me, me.  Let's get started!


ETA: Just a little something I learned: If you are expecting to meet people that know you from your avatar/profile picture, don't drastically change your look a week before meeting them (for example dying your hair from blond to black)  And yes, I know this from personal experience.  Check out my profile picture on the right side of my blog and then check out these photos, he he.


The day started on a bad note when I woke up late, but thankfully my husband noticed and I was able to get up and out of the house on time.  Once I got over that it was smooth sailing.  I arrived at my sister-in-law's house at 8:00 along with our scrapping buddy, Katie.  We made the 15 minutes trek to downtown Cincinnati to the convention center.  It's quite funny that we drove 15 minutes because there were people from all over the country, and a few from out of the country.    Papertrey Ink has quite the following.

We hauled our supplies into the convention center, checked in and found our table for the day.  Here's a picture of use girls, right to left it's me, Carrie (my SIL), and Katie.  At check-in we were given a very generous goody bag.  It included three stamp sets (one of which was the special edition set for the event), 2 pads of patterned paper, a note pad, and a bunch of papercrafting odds and ends like flowers and brads.
Here's a little glimpse of the room.  It accommodated seating for 200 stampers, 5 make-n-take areas, a retail area and many displays of cards using Papertrey Ink stamps and supplies.  

Here's the shopping area.  My photo doesn't do it justice.  Is was striking to see all the colors lined up together.  
The day started off with Nichole welcoming everyone and laying out the schedule of the day.  There were 5 make-n-takes in the morning and 5 in the afternoon.  Each make-n-take was led by one of the Sr. Design Team members.  The design team did not disappoint.  They were as lovely and kind as expected, but they were hilarious as well.  It was such a fantastic day.  
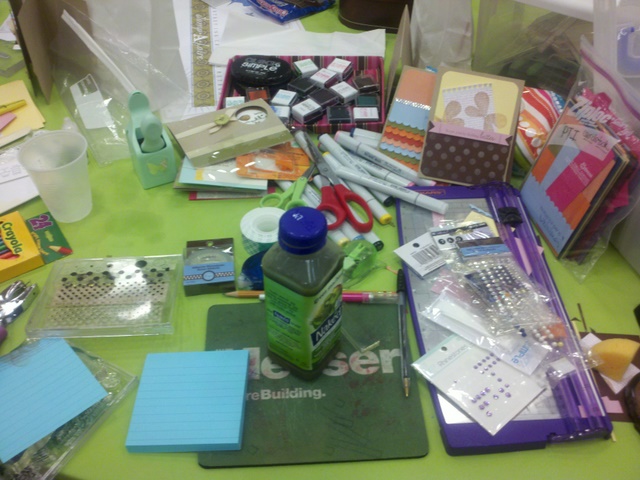
My stamp area, messy as always.

In between the make-n-takes we had some time to work at our table on whatever we liked.  I think I made four or five cards.  We spent a lot of time chatting and looking at the card displays.  Here's some of photos of card I took.  I've seen almost all of these online but it was really neat to see them up close in real life.


(click to enlarge)
Here's Heather Nichols in action at one of the make-n-take stations.  

When you finished a make-n-take card you received a stamp from the design team member for your passport.  I had them autograph all of mine, *squeal*!

We had a four hour break for dinner.  We went to eat at Rock Bottom Brewery and then for coffee at Starbucks.  We went back to the convention center at 9pm for a dessert reception.  That's where I was able to get my picture taken with all of the Design Team members.  Unfortunately a couple of them are blurry, but that's okay since I'll remember it forever.  
Me & Betsy Veldman
Me & Dawn McVey
Me & Lisa Johnson
Me & Heather Nichols
Me & Michelle Wooderson
Me & the Design Team
*squeal*
My fellow Clear & Simple Stamps design team member, Amber Daigre was there.  We've never met before, so that was super fun.  I also met a few people that I knew by name, but not by face.  I'm really good at remembering names, but not faces.  There were a few names I recognized from seeing there cards in magazines.  I even met a few people that had heard of me and my little blog.
Me & Amber Daigre
(fellow Clear & Simple Stamps Design Team member)
Me & Leigh Ann Baird
(She gave me some wonderful advice, hope it pays off *wink,wink*)

Dawn McVey wrote me a little note, it says "Dana, Loved spending the day with you! XO, Dawn McVey".  Betsy Veldman's autograph is there too.  So fun!  
Well, that's pretty much my day.  It was absolutely everything I thought it would be.  As always, Papertrey Ink thinks of everything and it's so well planned out. My only disappointment was that I didn't get my picture with Nichole Heady (or her autograph) but she was super busy coordinating things and being a super hostess.  I'll be back next year for sure, and I know I'll get a photo then.

Have a great day!


PS.  A shout out to some of my new friends: Deana Woodland, Maria Fiscella, Avril Tanner, Regan D'Agostino, Leigh Ann Baird, and Suzanne Dahlberg.  Hi girls!
PSS.  I'll share the make-n-takes tomorrow and I'll be sharing the cards I made in my free time over the next week or so.  

Read more...
Related Posts with Thumbnails

  © Free Blogger Templates Columnus by Ourblogtemplates.com 2008

Back to TOP