A Baby {Congratulations} Card...

Friday, August 31, 2012

Happy, Happy Friday!  Three glorious days of no homework or getting children ready for school.  Transitioning into back-to-school mode is HARD!  It's been two and a half weeks, it should be getting easier, right?  

So, I enjoying making cards, but today I NEEDED to make a card.  I needed to chill out and be in my own little world for a while and not worry about packing lunches or if I signed the kids' agenda.  I was not in the mood to come up with an original design, so I turned to my Card Inspiration Pinterest Board. I've had my eye on this card for quite a while, today is the day I finally CASEd it!

I looked through my dies and punches to come up with something different than a butterfly so my card didn't look exactly like the original.  When I CASE a card, I try to make it my own as much as possible.  So, as soon as I spotted the giraffe die, I knew I was destined to make a baby card.  
I haven't used patterned paper in I can't even remember how long.  I've been enjoying creating my own backgrounds with stamps.  However, I was in a mood for something different today and gravitated toward patterned paper.

Since I was pleased with how the boy card turned out, I thought, why not make a girl version?  So that's just what I did!

 And here they both are together.  Cute, right?
I hope you all have an amazing holiday weekend!  Here in the Untied States we are celebrating Labor Day on Monday so the kids are off school and my husband is off work.  We are planning on spending some time with friends and family, so I'm hoping that will recharge my battery for next week.  

Thanks so much for stopping by for a visit!

{Congrats Boy}
Stamps: All Occasions 1, Baby Shower (Clear & Simple Stamps)
Card Stock: Your Style Blue Me Away, Kraft Like a Rockstar, Trendsetter Blue (CSS)
Patterned Paper: Basics Manila (Basic Grey)
InkYour Style Blue Me Away, Dish All the Dirt Brown, Trendsetter Blue (CSS)
Dies: Baby Shower (CSS) 
Accessories: Foam Dots, Blue Gems, Stamping Sponge
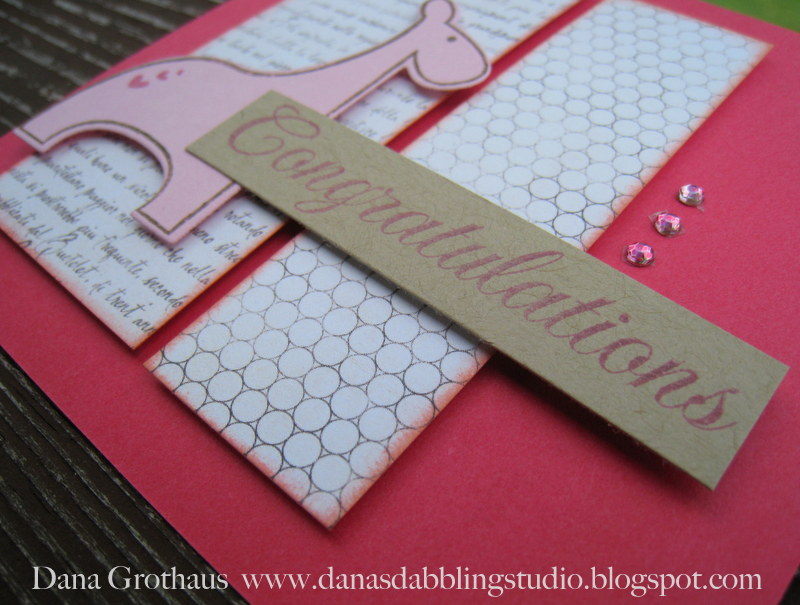
{Congrats Girl}
Stamps: All Occasions 1, Baby Shower (Clear & Simple Stamps)
Card Stock: Coral Necklace, Kraft Like a Rockstar, I'm a Princess Pink (CSS)
Patterned Paper: Basics Manila (Basic Grey)
InkPaint the Town Pink, Dish All the Dirt Brown (CSS)
Dies: Baby Shower (CSS) 
Accessories: Foam Dots, Pink Gems, Stamping Sponge 

Read more...

A {Fresh, Local, Organic} Card...

Thursday, August 30, 2012

Uh, I had a hard time coming up with a title for this post.  I usually just type the card sentiment, but this card is a little different.  I'm treating this card as a "blank card" or like a notecard that just has a pretty picture on the front.

This card started with the baskets of produce.  I stamped them all and colored them with watercolor pencils.  I assembled the produce with the masked baskets, and then I had to figure out how to arrange them on a card.  I do really like them "stacked" on the right with the frame around the perimeter of the card.
I couldn't really figure out a sentiment that was appropriate, so I decided to create a "scene".   I really love the natural look of this card that the kraft card stock lends it.  Very cool!

Have a great day!

{Produce}
Stamps: Rag Doll House: Stand (Clear & Simple Stamps)
Card Stock: Kraft Like a Rockstar, Brown Leather Satchel, A Blanc Check (CSS)
Ink: Perfect Little Black Dress (CSS)
Accessories: Watercolor Pencils, Aqua Painter

Read more...

A {Cheers} Card...

Tuesday, August 28, 2012

Hi there friends!!!  I have a fun card to share with you today.  I love pink and yellow and together they reminded me of pink lemonade.

I stamped the background first using the open square background building stamp Squares Plus and Paint the Town Pink ink on I'm a Princess Pink card stock.  The treatment on the bottom of the Coral Necklace panel was achieved by using the larger Tags 2 die with the card stock trimmed narrower than the sides of the die and then only fed through the Cuttlebug until just the bottom was cut, not the top.  Make sense?  I wish I had thought to take a photo.
I stamped the lemonade glasses from Rag Doll House: Stand with Perfect Little Black Dress ink on A Blanc Check card stock then colored them with copics (see supply list for exact colors).  I cut out the glasses and applied them to the panel with a Say Yellow to All Your Fans die cut using the Word Window die.  I love the look of the glasses sitting on a try.  The sentiment "cheers" comes from the set Trinket Sentiments.

Feeling like I'm getting in a groove!  Let's hope I can keep it up.  Have a great day!

{Cheers}
Stamps: Rag Doll House: Stand, Squares Plus, Trinket Sentiments (Clear & Simple Stamps)
Card Stock: A Blanc Check, I'm a Princess Pink, Coral Necklace, Say Yellow to All Your Fans (CSS)
Dies: Tags 2, Word Window (CSS) 
Ink: Perfect Little Black Dress, Paint the Town Pink (CSS)
Copics: Y35, R81, R83, R85, W1 

Read more...

Papertrey Ink August Blog Hop...

Saturday, August 25, 2012

It's time for Papertrey Ink's monthly blog hop!  It's been a few months since I was able to participate, so I'm really excited I had the time to participate this go round.
The theme this month is autumn texture, think warm and cozy.  I used some really old Stampin' Up twill tape for the main texture on my card.  It was about an inch and a half thick, so I sliced it down the middle before weaving it in a basket-like pattern.  

The flowers come from the set Icon Images that I received for attending the Stamp-A-Faire last year.  I stamped the flowers on cream card stock first and then cut them out with scissors.
The little tag was cut from a CSS die, Tags 2, and stamped with a sentiment from Mixed Messages.  I've had that stamp set FOREVER, it was one of the sets in my very first PTI order.  

Thanks for hopping by!  

{Birthday Wishes}
Stamps: Icon Images, Mixed Messages (Papertrey Ink)
Card Stock: On the Catwalk Cream, Glamazon Green, Green with Envy, Brown Leather Satchel (CSS)
Ink: Orange You Fabulous, Paint the Town Pink (CSS)
Dies: Tags 2 (CSS) 
Accessories: Twill Tape (SU), Glue Dots, Silver Brads

Read more...

A {Happy Birthday} Card...

Friday, August 24, 2012

Hey friends!!!  You can't ever have too many birthday cards, right?  I made this super simple card today to share with you.  This card would be very quick to recreate, most of the time is spent wiping the ink off the stamp so you can use it again for the next color of ink.

This card would have come together a lot faster, but I spend a lot of time making a skinny rectangular panel for the sentiment that I was going to adhere to the lower right side of the card.  I got so frustrated about what color it should be, etc, that I finally just stamped the sentiment on the card, AND I LOVE IT!!!  Clear & Simple Stamps have the best black ink (Perfect Little Black Dress), just sayin'.
This card is one layer, which doesn't happen very often for me, but I love when it does happen.  

Thanks for popping in, have a wonderful weekend!!!

{Happy Birthday}
Stamps: Circles Plus, All Occasions 1 (Clear & Simple Stamps)
Card Stock: On the Catwalk Cream (CSS)
Ink: Glamazon Green, Green With Envy, Orange You Fabulous, Paint the Town Pink, Creamsicle Cardigan, Perfect Little Black Dress (CSS)

Read more...

Card Storage & Packaging...

Thursday, August 23, 2012

Hey guys!  A fun opportunity has come up for me to sell my cards at a local shop.  Over the past few days I've been wracking my brain for ways that I can display and package my cards (and also not spend much money doing it).  So, here's what I came up with.
This is a box that I've been holding onto FOREVER to turn into a card storage box.  It came from Target and originally held mini bags of potato chips.  It is the PERFECT size for A2 cards.
First, I wrapped the box with some kraft wrapping paper.  I wrapped a long piece of green tulle around the box and tied it in a bow.  I did the same thing with some hemp twine, but tied that in a knot.  (BTW, the cards inside are not going to stay like that, read on).
I used some CSS dies for the tags and their Alpha Modern stamp set.  The little tag uses a stamp that says "handmade just for you" from the Craft Room Sentiments set.  After the tags were made, I threaded the hemp twine through the tag holes and tied a bow.  Now, onto the cards.
All of the cards will be stamped with my name on them.  This is a stamp I received from  CSS for my birthday a couple years ago.  Aren't they the best?!  I use that stamp all the time.
I bought some clear acetate bags at Walmart (97cents for 20).  Each bag contains a card and envelope.
The tops of the each bag are folded over and secured with a sticker.  They say "Handmade by: Dana Grothaus" and then in small print under that is a note that says "all cards are blank inside".  I love that each card has it's own little package, not sure how I'm going to package card sets yet, but this'll get me started.  

I also bought some post-it flags that will go on each package to tell what occasion the card is for in case someone is looking for something specific.  

The cards that I've chosen to sell first are ones that I made a long time ago where the supplies are no longer available and have no chance to be published because of that, but they are all still super cute.  (I'm been horrible at submitting cards to magazines and haven't for about the last 8 months, but I submitted a few for this last CARDS Magazine call and one was accepted!  Yay!).  

Anyone have any experience with selling their cards at a shop?  Any advice for me?  Pricing?  Inventory?  So far I've only sold to family and friends.

Have a great day and thank you so much for stopping by!!!

Read more...

A {Just a Note} Card...

Tuesday, August 21, 2012


Hey there!  Guess what I did this morning?  Yup, I made a card on the fly!  I read about a new challenge called The 10 Minute Craft Dash.  A card in 10 minutes?  Sounds like the perfect way for me to ease back into daily crafting.
CraftDash
Luckily you are able to get your supplies together (and an idea) before the clock starts.  I'll tell ya, I used every second of the 10 minutes.   The card I made is a mix of this card and this card I pinned on Pinterest a while ago.
Here's a look at my supplies before I started crafting.  I even sketched out the card on a post-it to keep me on track.  Notice I'm missing the black gems that appeared in the end product.  That was a mad dash at the end to find them!
Another fun thing going on today is that I have a super cute card featured on the Clear & Simple Stamps App for the iPhone and iPad!!!
Thanks so much for stopping by!  Have a wonderful day!!!

{Just a Note}
Stamps: All Occasions 2, Mini Squares (Clear & Simple Stamps)
Card Stock: A Blanc Check, Orange You Fabulous (CSS)
Ink: Perfect Little Black Dress, Orange You Fabulous (CSS)
Accessories: Black Gems, Butterfly Trio Punch (Martha Stewart), Foam Dots

Read more...

A {Birthday Wishes} Card...

Monday, August 20, 2012

Hello, hello!  This school year has not gone as expected.  Last year I had a routine, certain days I worked, volunteered, exercised, etc.  The kids should have been in school for three days now, but Colin came home "sick" on Thursday and had to stay home Friday.  All of this "not going as expected" and "craving routine" is making me one cranky momma.  I expect a lot from myself and it makes me crazy not being able to check everything off my to-do list.

On a happier note, check out my card for today!  It is bright and cheery!  The background was created by using the new Sunburst background stamp from Clear & Simple Stamps.  I simply stamped the sunburst on A Blanc Check card stock using Simply Blue-tiful ink.  I made my cuts one inch from each side, notice the middle panel is a bit larger than the sides?  I sponged the edges with Orange You Fabulous ink and attached the panel to the card base using foam dots.
On a thin strip of Orange You Fabulous card stock, I stamped a "birthday wishes" sentiment from Trinket Sentiments using Simply Blue-tiful ink once again.
I adhered the strip to the sunburst panels and added that cute flower button.  The button is threaded with a sliver of Simply Blue-tiful card stock, so easy!

Have a great day!

{Birthday Wishes}
Stamps: Sunburst, Trinket Sentiments (Clear & Simple Stamps)
Card Stock: A Blanc Check, Orange You Fabulous, Simply Blue-tiful (CSS)
Ink: Simply Blue-tiful, Orange You Fabulous (CSS)
Accessories: Foam Dots, Button, Stamping Sponge, Glue Dots

Read more...

Clear & Simple Stamps: Group Project!

Tuesday, August 14, 2012

Hey there!  This month's CSS Design Team challenge is to embrace WHITE while we can, before Labor Day!  For my card I chose to use a lot of white space, which I love to do anyway.  

As you can see, this card is pretty darn simple.  I did break out a ruler and pencil to find the center of the card and to also make sure my squares were lined up properly and not on a slope.
Check out those squares!  It's a stamp from Mini Squares and I am in love with the design, so simple yet so bold.  And look, one layer!
I can't wait to check out the other Design Team creations.  They are sure to please, like always.


By the way, this is my last post before the kids go back to school.  I have really mixed emotions about that.  I am looking forward to creating on the fly as opposed to these pre-planned posts.  I have come to realize that you wonderful readers will not abandon me if my posts are sporadic and that is such a nice feeling.  I really put a lot of pressure on myself to post new content, but this summer was really focussed on my kiddos and I really enjoyed it.  I'll be back to posting 4 days a week shortly!

Have a great day!

{Happy Birthday}
Stamps: Mini Squares, Craft Room (Clear & Simple Stamps)
Card Stock: A Blanc Check (CSS)
Ink: Perfect Little Black Dress, Dare to Be a Diva Red, Glamazon Green, Simply Blue-tiful (CSS)

Read more...

Clear & Simple Stamps: Party Hop!

Saturday, August 11, 2012

Hi there!  Welcome to this month's Clear & Simple Stamps Party Hop!  This month the design team and I are using a brand new stamp set called Party Elements: Celebration (available to order today!).  This set can be used to create invitations for a wide array of events.  The theme I chose is pool party!  

Here's my ensemble, complete with a party favor treat bag.
The colors I chose were really a no-brainer for a pool party. I picked Simply Blue-tiful and Your Style Blue Me Away for my color palette.  I lined all the word stamps up on my clear block so I could create the invitation with just one stamp impression, what a time saver!  Then I added the banner at the top and bottom.    
These invitations really came together fast, but you would never know it by how professional they look.   I was able to make a stack in just a few minutes once I got the design down.
This candy treat bag completes the look.  I carried over the colors and the banner image.  The stamped the bag before I assembled it, so much easier that way!  The bag uses the Party Favor 1 die.  I added two tags stamped using an image and sentiment from Trendy Tags 2.  The tags themselves are were cut using Tags 2 dies and then attached to the bag using Bright Blue/White Baker's Twine.

So many designers are joining us for the Party Hop!  Be sure to stop by and see all the great creations using Party Elements: Celebration.


Have a great day!

{Splish Splash}
Stamps: Party Elements: Celebration, Trendy Tags 2 (Clear & Simple Stamps)
Card Stock: A Blanc Check, Simply Blue-tiful, Your Style Blue Me Away (CSS)
Ink: Your Style Blue Me Away, Simply Blue-tiful (CSS)
Dies: Tags 2, Party Favor 1(CSS) 
Accessories:  Bright Blue/White Baker's Twine (CSS), Sticky Tape

Read more...

CSS Release In Review: Day 4

Wednesday, August 8, 2012


Hello!  Today is Day 4 of Clear & Simple Stamps release review!!!  Today we are focusing on Shapes and Backgrounds.  I'm sharing a card that is probably my favorite of this release in review.  It was really simple to make and only used two stamps, but a lot of different colors of ink.  
I really love cards that use the colors the rainbow, in that order.  Thank goodness for ROY G BIV, or I would never remember the order of the colors.  Although if you look at my card, it's backwards.  That's because when I was figuring out where to put my sentiment, over the yellow was where it showed up the best, but wasn't in the best position.  So, I just flipped that panel upside down.  

I built the background of my card by using the solid square background building image from Squares Plus.  I simply stamped once with each color of the rainbow.  I chose a plain black base to really make the colors pop.
 Check out the other CSS DT ladies and their creations using Shapes & Backgrounds:


Have a great day!

Read more...

CSS Release Review Day 3...

Tuesday, August 7, 2012


Hello!  It's day 3 of Clear & Simple Stamps release in review!  I have a really cute card/tag to share with you today.   It's soooo simple, I think that's why I like it so much.  Too bad the creative process wasn't fast and simple, but now that it's come to fruition, it'll be super fast and simple for you to recreate!
These two greens (Glamazon Green & Green With Envy) make one of my most favorite color combos.   So, my card base is 3" x 3" and I used the die from Tags 2 for my Green With Envy tag.  I stamped the tag with an image from Trendy Tags 2 using Glamazon Green ink.  

The banner is sort of a fake out!  It looks like one of those folded banners, but this version is sooo much easier.  Check out the close-up below for a visual picture, but I'll explain it too.  I took a skinny piece of A Blanc Check card stock, I trimmed it to the width of the card, added the cuts to make it look like a flag banner, then I adhered it under the tag.  At this point I adhered the tag panel to the card using foam dots.  I took the leftover piece of A Blanc Check card stock, trimmed it to a little wider than the tag, stamped my sentiment (also from Trendy Tags 2) and adhered it to the tag using foam dots.  Sounds complicated, but really super easy! 
You won't want to miss what the other ladies of the CSS DT created using Tags, Toppers, Edgers and Borders!


If that wasn't enough excitement, I have a project featured on the Clear & Simple Stamps App for the iPhone!
Have a great day!

{Please Take One}
Stamps: Trendy Tags 2 (Clear & Simple Stamps)
Card Stock: Glamazon Green, A Blanc Check, Green With Envy (CSS)
Ink: Glamazon Green (CSS)
Dies: Tags 2 (CSS) 
Accessories: Foam Dots

Read more...
Related Posts with Thumbnails

  © Free Blogger Templates Columnus by Ourblogtemplates.com 2008

Back to TOP